Last update [October 21, 2025]
Once your store is enabled (find out how to enable it here), your first step is to begin creating your activities. This is the foundation of your business as, without activities created, you are unable to sell your products!
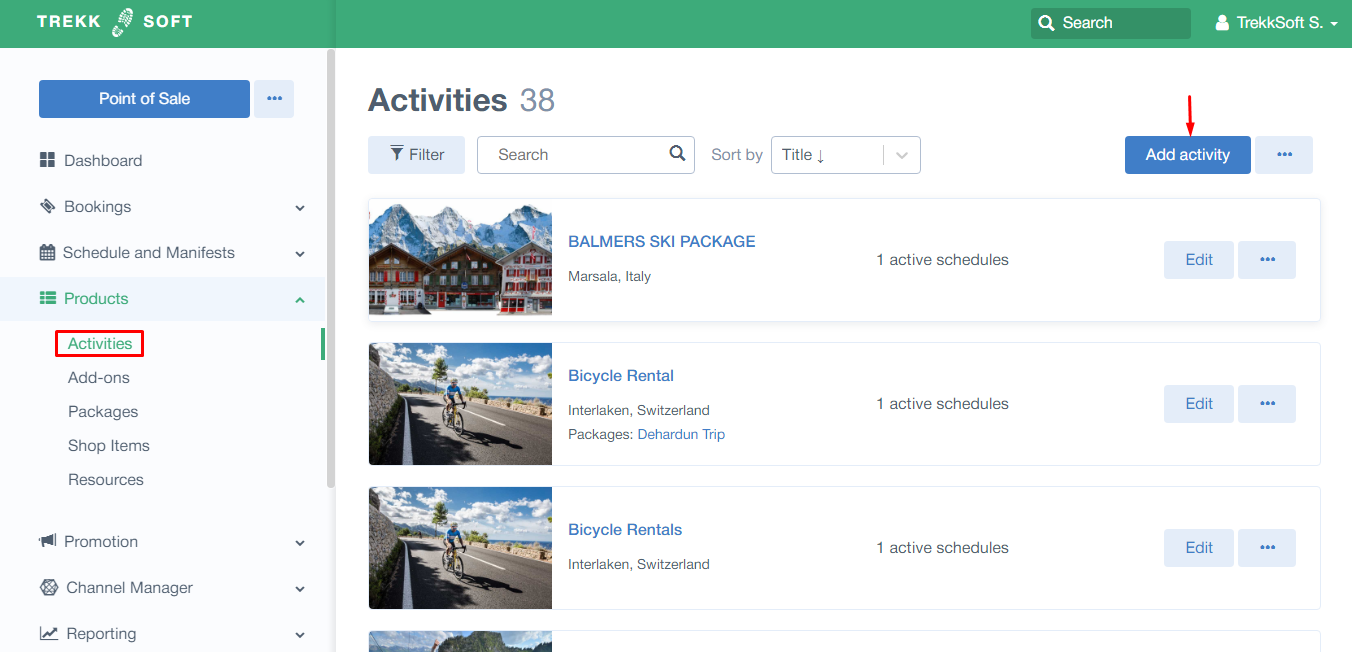
To begin creating activities you must navigate to the activities page. You can find the activities page by logging into your Admin Desk and in the left-hand menu, click on Products > Activities > Add activity(as shown below).

When creating an activity, you will notice the activity is divided into three parts:
First, Let's focus on the Activity Info. Then we will focus on some Useful Information and finally Advanced Options and Multilingual Activities.
Tip! You can create activities in multiple languages to suit your needs. Find out more at the bottom of this article here
________________________________________________________________________
Activity Info
If you have not done so already, go to the navigation bar on the left-hand side and click on the Products drop-down menu and then Activities as shown above. Now you are on the Activity Overview page. Click on the Add Activity button.
You will now need to complete each of the fields providing all necessary information related to your activity. You can give the activity a Title, Description, and Location (default to the nearest large city).
The activity information has the following options. Required fields are marked with an asterisk (*).
- Title* - Add a title for your activity describing what you are offering!
- Category - Choose a category from the drop down which best fits your activity
- Description* - Describe your product. Give details of the activity and the benefits of purchasing it. Entice your guests!
- Highlights* - List the highlights of your activity. It's common to make a bullet point list detailing specific points of the activity.
- Itinerary - Tell your customers about the location/route of your trip, what they will see and what they will experience.
- Departure Point* - Enter the departure point of your activity. Choosing a location also makes it useful for finding your activities later and for your guests to find activities by location on your website.

Once completed, for now, click the Add Activity button.
Next, a popup will show where you will complete your schedule information. You can find out how to Create Your Schedules here.

Next, a popup will show where you will complete your pricing information. You can find out how to Create Your Pricing here.

Tip! The activities are listed in an Alpha-numeric order by default. So if you would like to list down your activities in an ordered way you can name them like this
"1. Activity Sample #1
2. Activity Sample #2"
and so on...
________________________________________________________________________
Useful Information
Your activities can be through one of the following methods:
- Using the TrekkSoft Website Builder - For each activity created, the website builder automatically creates a new website page for it. The pages are created under a new tab called 'activities'. The activities page will appear in your website navigation menu after you create your first activity.
- Add "Book Now" buttons on an existing website. Here you have two options:
a) The first option is the most popular as it involves fewer clicks for your potential customers. On the activity listing or page on your website, the "Book Now" button is visible. When this button is clicked, it will first show the availability calendar for the selected activity.
b) The second option shows your activity details first, before proceeding to the availability calendar and finally "Book Now".
To add Book Now buttons to your page, view the Help page here. - Through Online Travel Agents (OTAs) - If you have agreements with Online Travel Agents e.g. Get Your Guide, Expedia, Viator, etc. you can connect your activities directly to those sites to sell.
________________________________________________________________________
Advanced Options
At the bottom of the Activity Info page (described above), you'll see an Advanced Options drop down menu.
Here you can upload activity images, custom fields, taxes , add-ons and resources.
Additionally, there is an option for Other Settings. The options available under this menu are:
- Is the activity bookable? Is your tour or activity currently running? If yes, tick this option. You can deactivate (untick) this option off-season or if you want to discontinue the tour.
- Can customers send an inquiry: Activate this if you want to enable website visitors to inquire about the specific activity before booking i.e. questions, dates, personal requests, etc. To ensure you capture relevant information you can edit the inquiry form customers will complete from the fields menu.
- Do you want to confirm the booking before charging the customer: When this option is ticked, your customers will be able to book even if you have not yet confirmed the departure. In the meantime, the customer's payment will be reserved on their bank account and only charged once the departure is confirmed.
This decision is based on your requirement for a minimum amount of guests attending or cut-off time for booking an activity. If you choose to cancel an activity, all registered participants for that activity will be notified via email (This feature only works while using the Payyo system). - Customers cannot redeem discount codes with this activity: If this option is ticked, customers will not be able to redeem gift codes on the activity.
- Allow discounts when multiple trips are booked. If the option is ticked, this activity can be used for multi-discounts (more information on multi-discounts is available here). This option does not apply to packages.
When you have finished entering all the information about your activity, click the Save button.
________________________________________________________________________
Activities In Multiple Languages
Whilst creating your activities, you can create an activity in multiple languages. You just need to select the language while creating and you are ready to go!
note: you must have the multiple languages enabled in your profile to select multiple language activities (more information is available here)
To begin creating an activity in another language, follow these steps (or watch the video example below):

- In your Admin Desk on the left-hand side, click on Products > Activities.
- Now you're in the activities dashboard. On the right-hand side, click on the Add Activity button.
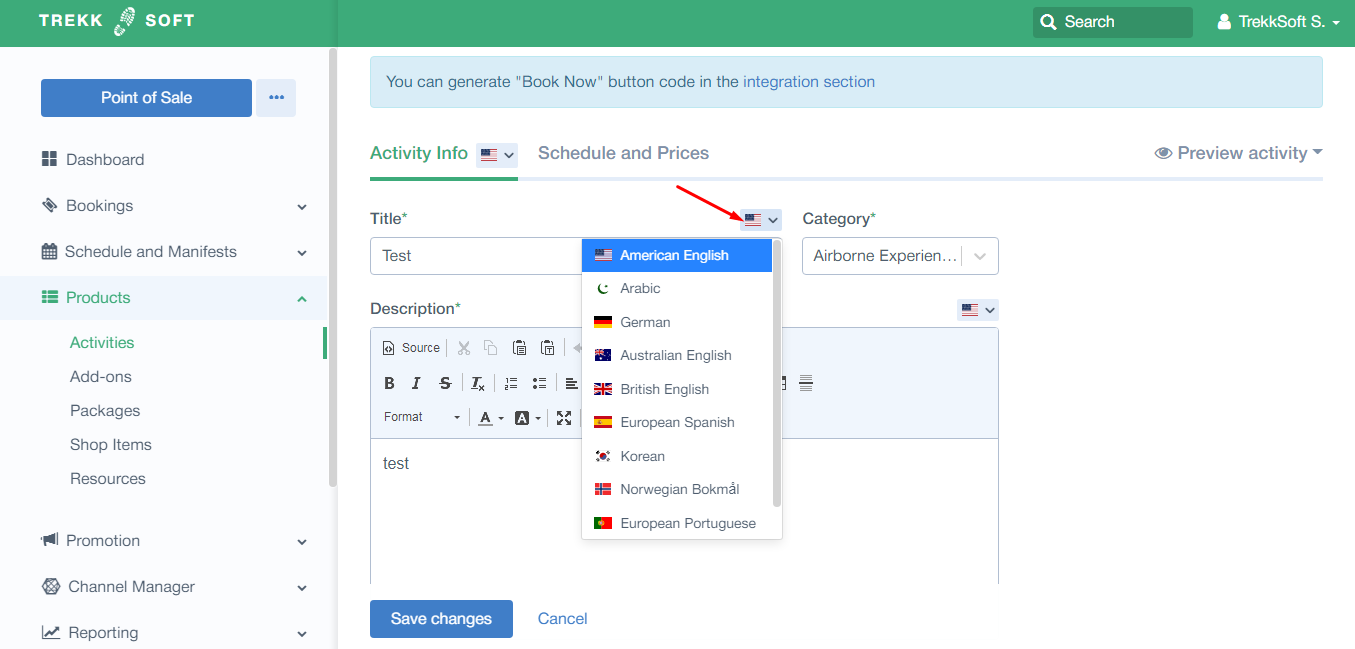
- The first field to edit is the Title. Above this field on the right is a small flag (relating to a country/language). Click the flag icon and you choose the flag for the language you wish to create the activity in (see below).
- Once the language is selected, you can add information into the activity details in your chosen language.
![]()