Here's an overview of what we cover in this article:
________________________________________________________________________
Booking Widget Integration types
Find the short description below for each Integration type that is available with Booking Widget 3.0. Just click on the desired Integration type heading to get detailed information on how to integrate it.
- Activity booking: This integration is perfect for your booking pages. Select the relevant activity and let users view your activity calendar and start the booking process the moment they click on the booking button.
- Inquiry: You can add an "Inquiry" button to allow customers to ask for a specific date for a tour or activity.
- Shop Items: Add integration for your shop items, such as vouchers, t-shirts, or any other merchandise.
- Package booking: Create packages from your activities and add a booking button for these packages to your website.
- Activity details: If you would like to show descriptions, routes, and images before kickstarting the booking process, you should use this integration.
- Package details: If you would like to show full package info and a book now button, you can select this button type.
- Activity collection: Curate a collection of activities and use this integration to display your curated list.
- Activity finder: This integration is useful if you would like to list out all the tours available and allow users to use date and departure city filters to find the perfect tour.

- Floating cart: The floating cart is automatically added to pages that have the booking button in place. For the floating cart to work on other pages without booking buttons, a special line of code needs to be added to the header or footer of the page. Pages like "About Us" or "Contact Us" should have the Floating Cart's code added.
- Function Integration: This type is for the advanced user who would like to use a function to open the booking widget on the page. In this way, you can create a customized button on your website and open TrekkSoft widget using this function call.
- ________________________________________________________________________
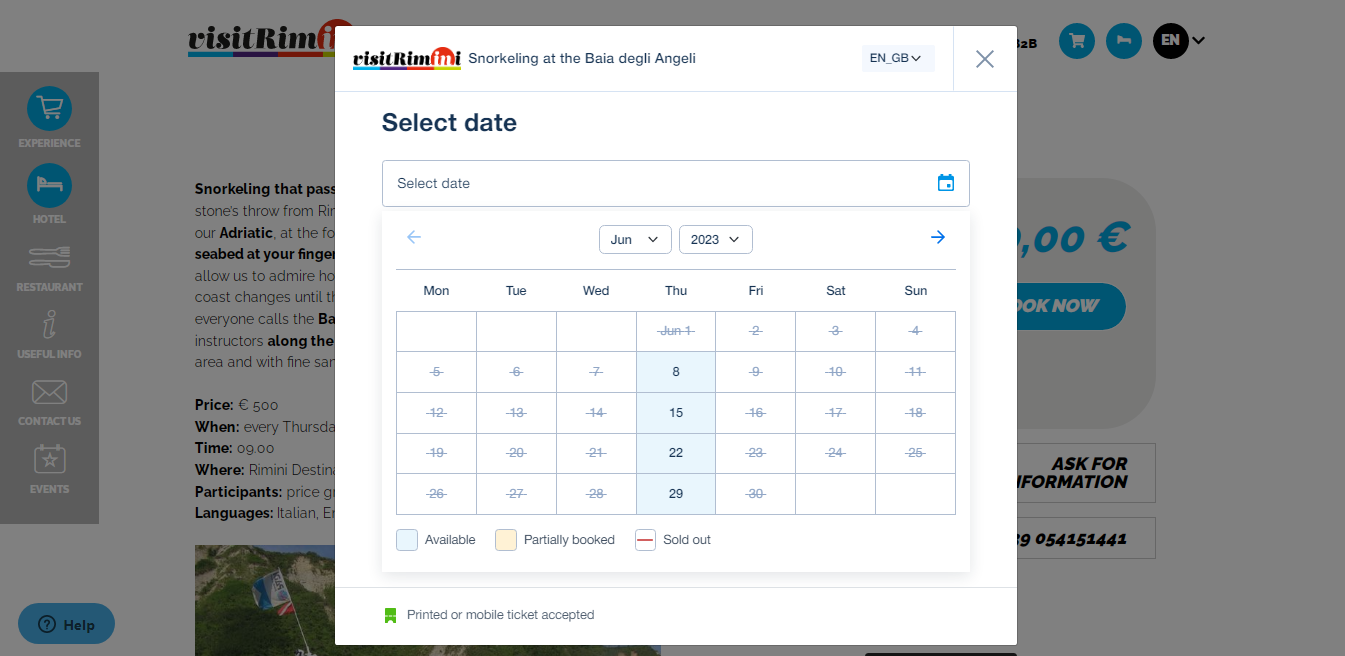
Activity Booking Integration type
This integration is perfect for your booking pages.
Select the activity you want to make bookable on this page and let users view your activity calendar the moment they click on the booking button and proceed to book an experience with you.
How to set up
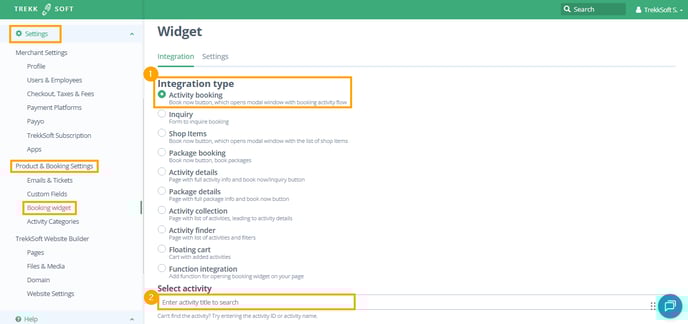
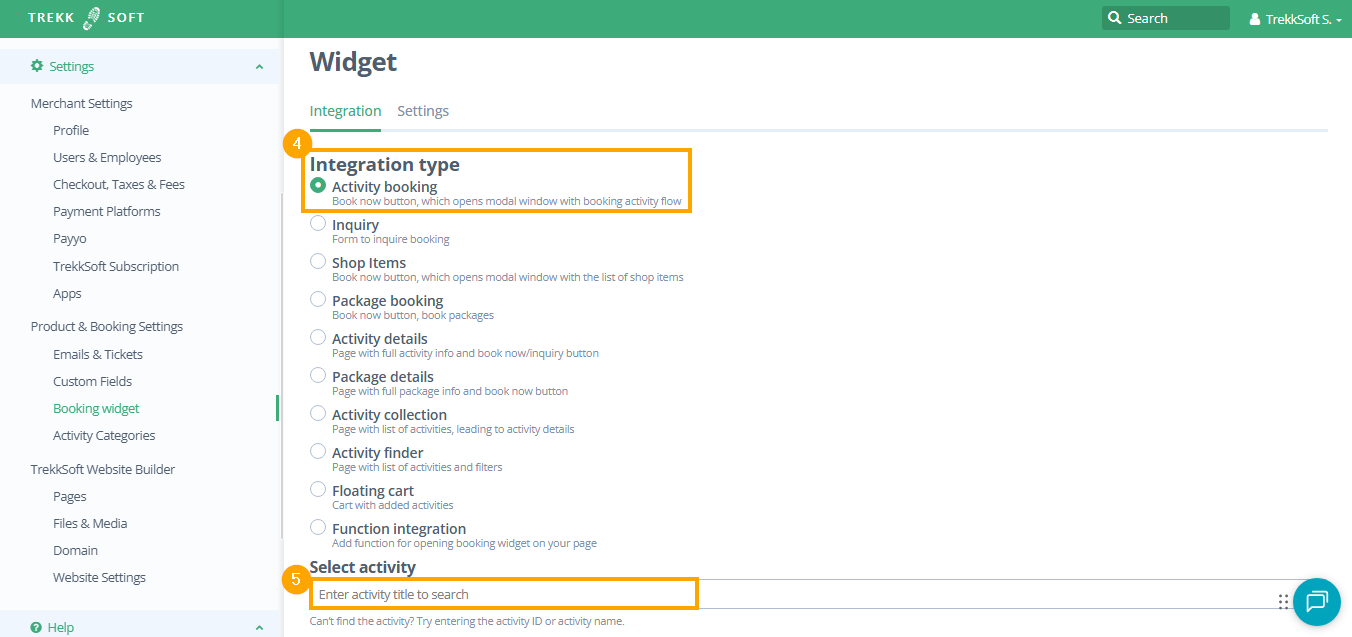
- To start, go to your Backoffice and then navigate to Settings > Product & Booking Settings > Booking widget. From the Integration type section, select the "Activity booking".
- Now, from the Select activity section, select the desired activity.
________________________________________________________________________
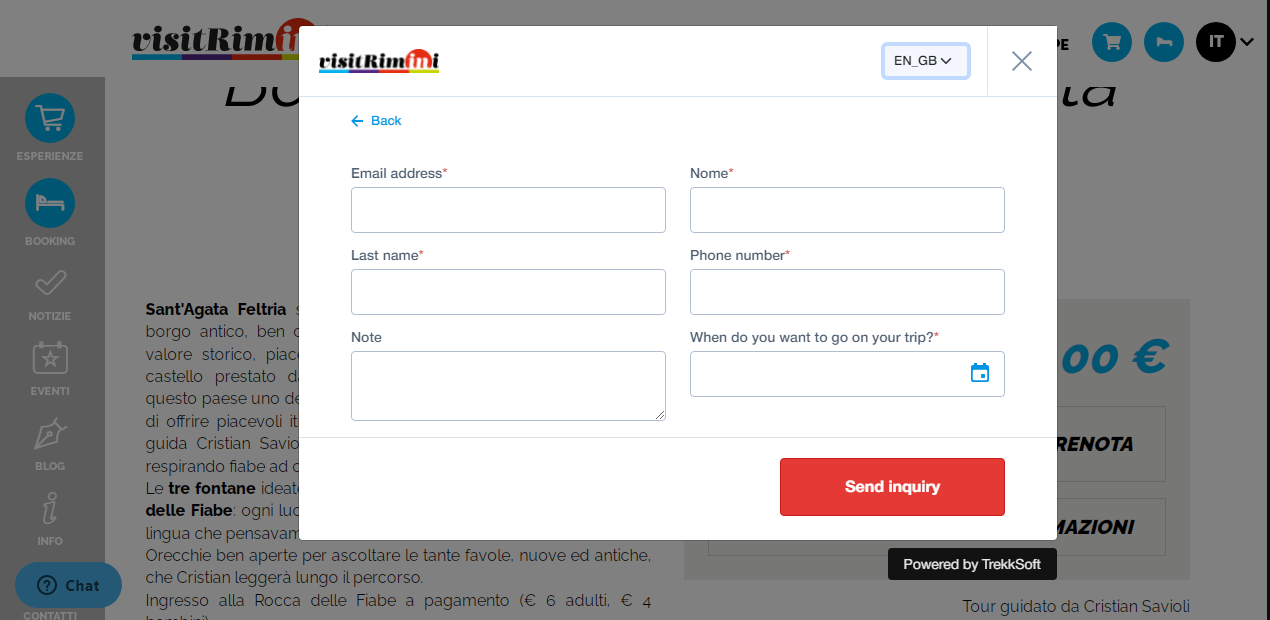
Inquiry Integration type
Besides the "Book Now" button, you can also integrate an Inquiry button on your website.
You can add an Inquiry button to specific activity pages for customers to ask about dates when you don't have availabilities (perhaps you've sold out or don't run a tour on those days), or you run a private tour and you don't have a fixed schedule for it.
Your customers will be able o send an inquiry for a certain activity by entering their email address and selecting a date.
How to set up
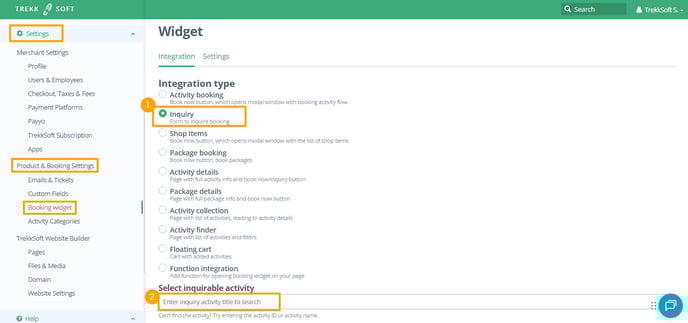
- To start, go to your Backoffice and then navigate to Settings > Product & Booking Settings > Booking widget. From the Integration type section, select the "Inquiry".
- Now, from the Select inquirable activity section, select the desired activity.
What happens with inquiries?
After the inquiry is sent, your customer will get an automated email in the inbox confirming the sending of the inquiry. Additionally, you as the supplier will receive a notification via email and the inquiry will appear in your Backoffice under Bookings > Inquiries.
________________________________________________________________________
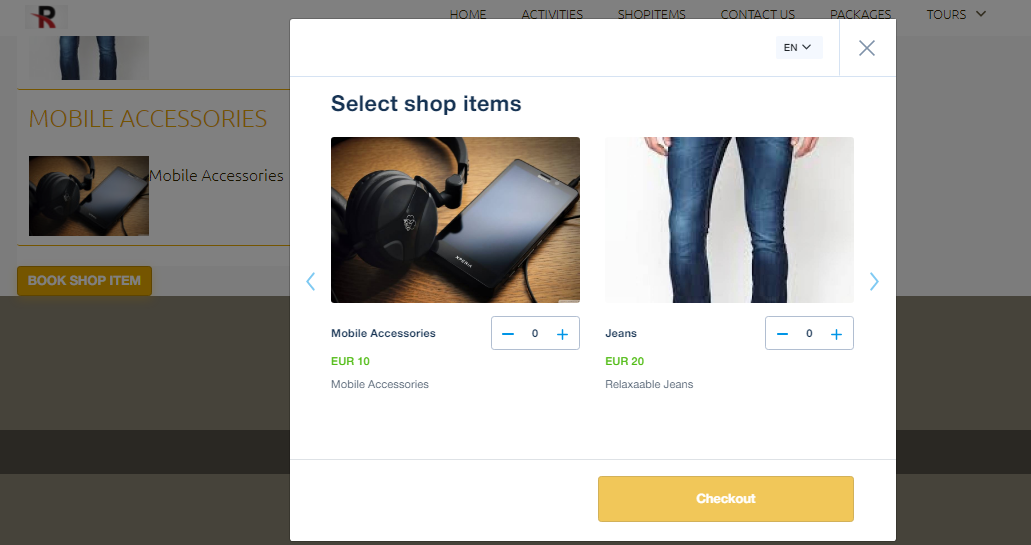
Shop Items Integration type
This is useful when you would like to integrate the Shop Items booking widget on your website to sell the shop items available on your account.
How to set up
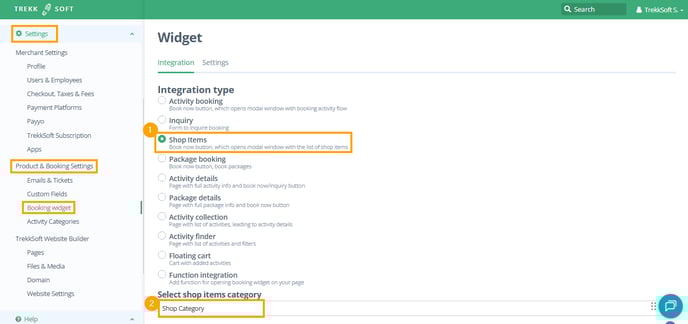
- To start, go to your Backoffice and then navigate to Settings > Product & Booking Settings > Booking widget. From the Integration type section, select the "Shop Items".
- Now, from the Select shop items category section, select the desired category.
IMPORTANT !
- Please be noted that you can't generate a widget for the single shop items. You can only generate a widget for the Shop Items category.
- Please refer to our Help Center article to get more details on how to create a shop items category.
________________________________________________________________________
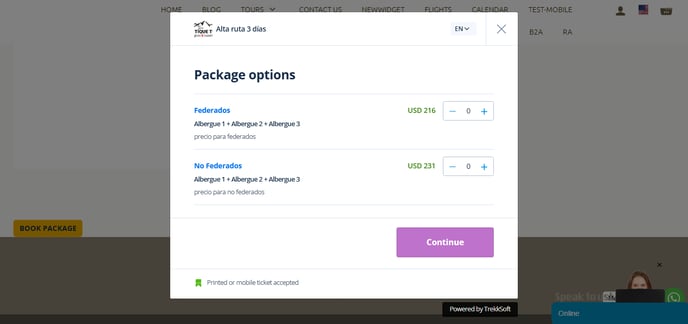
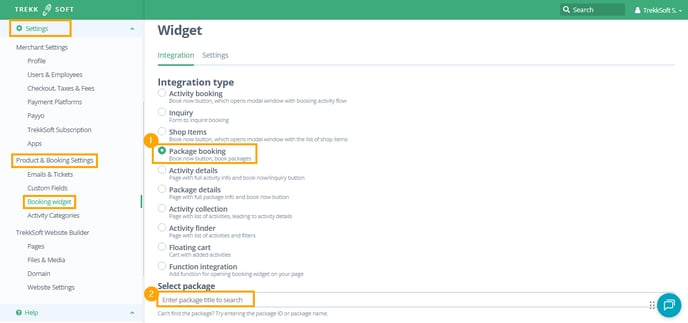
Package booking Integration type
If you already have a description of the package added to your page then you can display a booking calendar directly to proceed with the booking further.
How to set up
- To start, go to your Backoffice and then navigate to Settings > Product & Booking Settings > Booking widget. From the Integration type section, select the "Package booking".
- Now, from the Select package section, select the desired package.
________________________________________________________________________
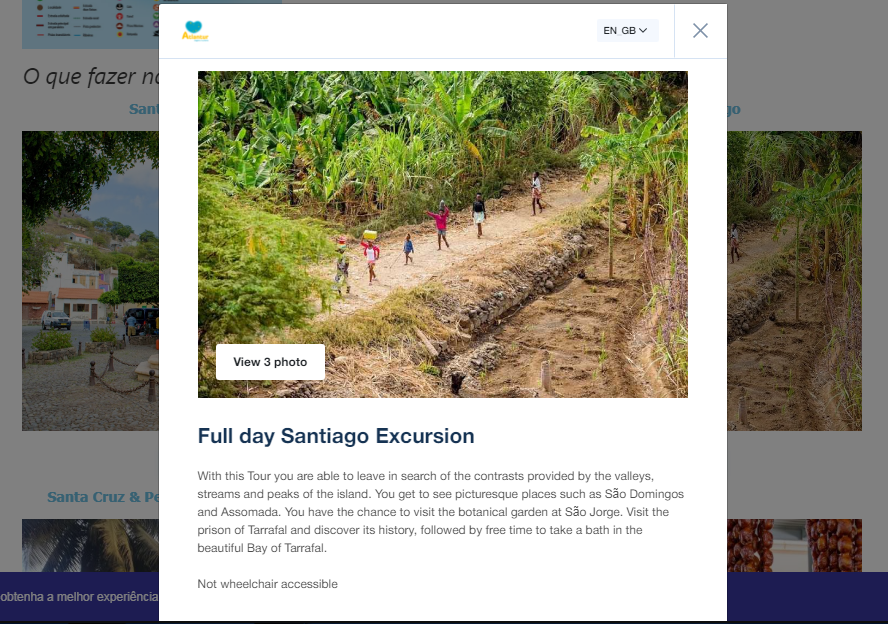
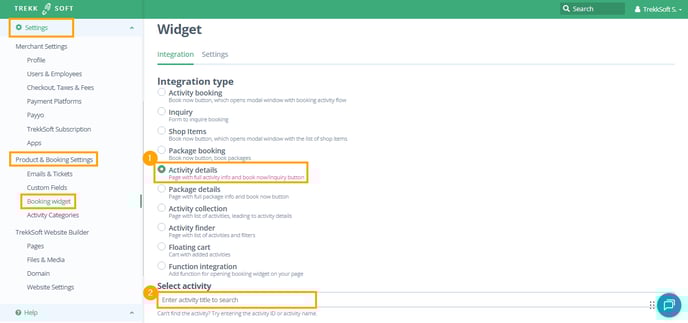
Activity details Integration type
If you have any activity-related content added to your Activities in your TrekkSoft accounts, such as descriptions, highlights, or images you can display them before taking the customers to the booking calendar with this button type.
How to set up
- To start, go to your Backoffice and then navigate to Settings > Product & Booking Settings > Booking widget. From the Integration type section, select the "Activity details".
- Now, from the Select activity section, select the desired activity.
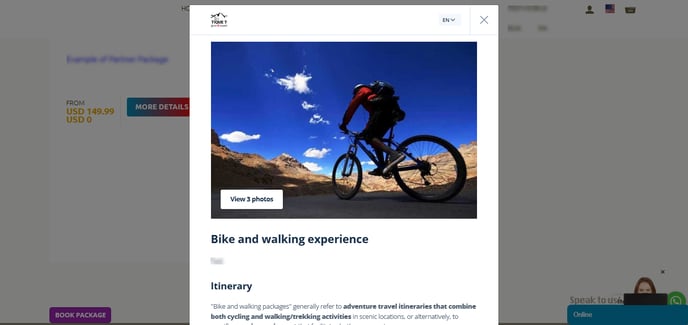
Package details Integration type
You can combine multiple activities (or just use one) into a package, so your customers can book a predefined combination of activities for a different price.
How to set up
- To start, go to your Backoffice and then navigate to Settings > Product & Booking Settings > Booking widget. From the Integration type section, select the "Package details".
- Now, from the Select package section, select the desired package.
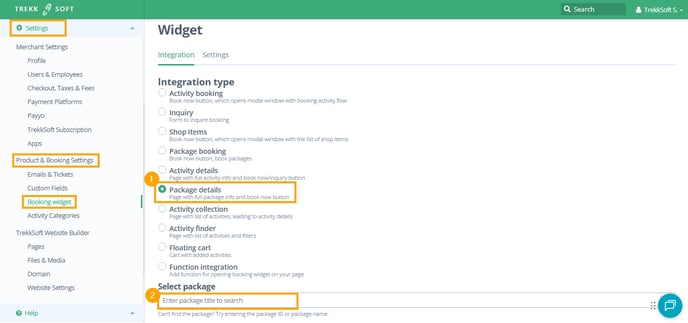
You can read more about Packages here.
________________________________________________________________________
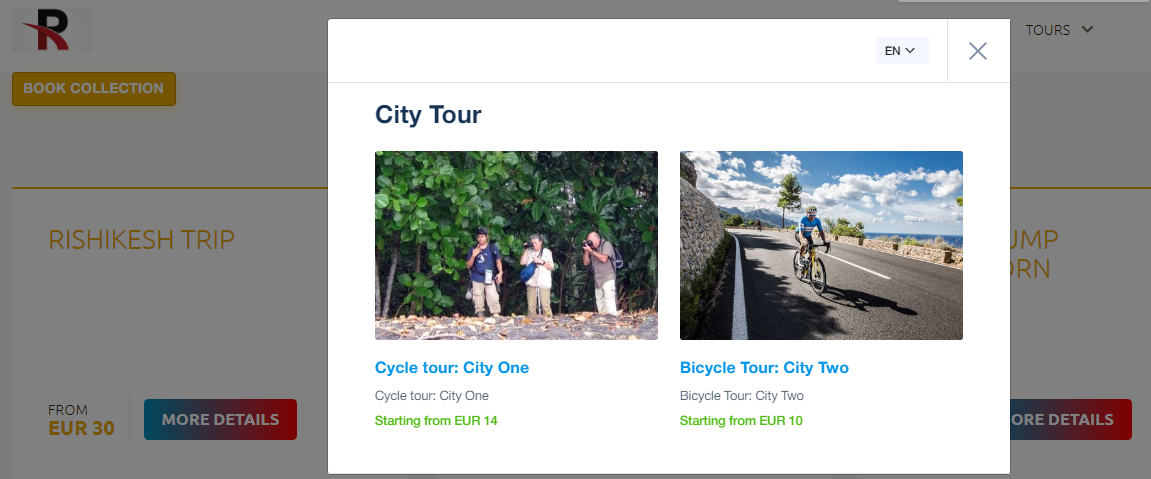
Activity Collection Integration type
You can create a customized grouping for your activities based on categories such as departure location, seasonality, or activity type. There is also a default group where all your activities are added automatically. You can also set your custom collection as the default collection.
You can then place a booking button on your website which will bring up all the activities in that collection.
Create Activity Collections under Settings > Product & Booking Settings >Activity Categories.
How to set up
- To start, go to your Backoffice and then navigate to Settings > Product & Booking Settings > Booking widget. From the Integration type section, select the "Activity collection".
- Now, from the Select collection section, select the desired collection.

You can learn more about Activity Collection here.
________________________________________________________________________
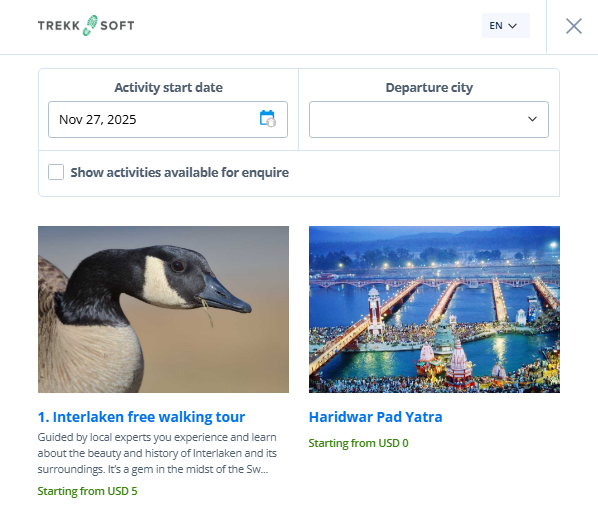
Activity finder Integration type
This integration is useful if you would like to list out all the tours available and allow users to use date and departure city filters to find the perfect tour.
How to set up
- To start, go to your Backoffice and then navigate to Settings > Product & Booking Settings > Booking widget. From the Integration type section, select the "Activity finder".
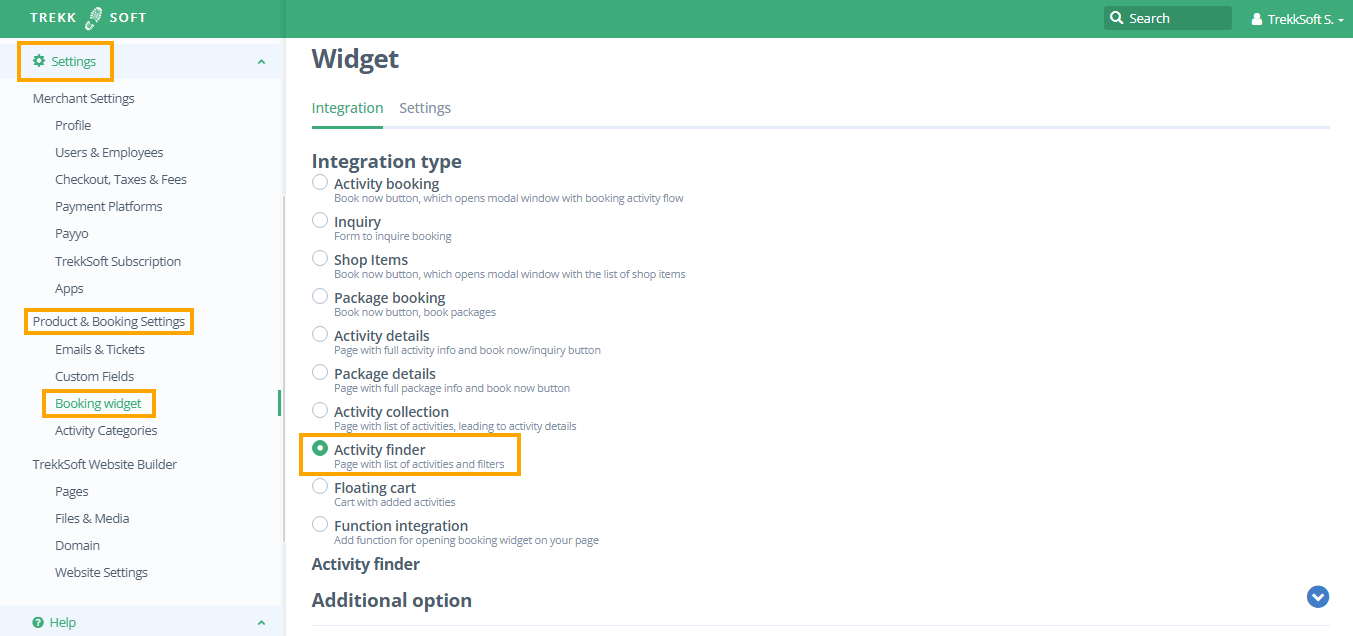
- This is what the Activity finder Integration will look like on your website.
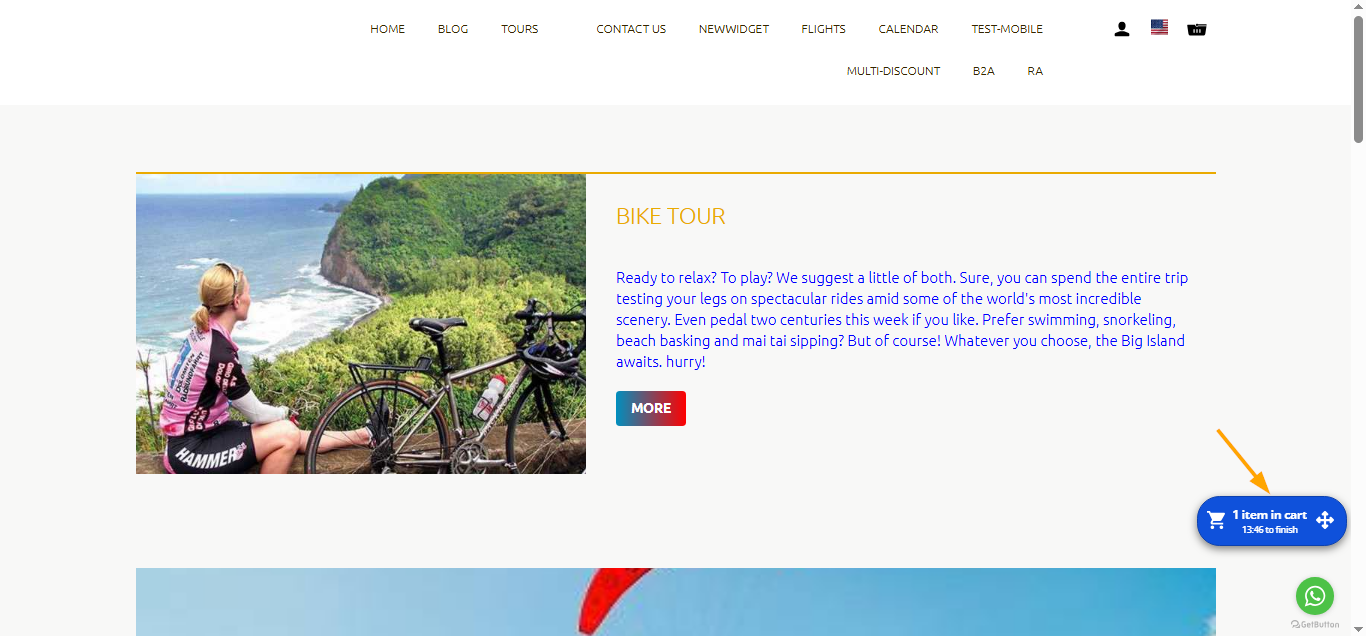
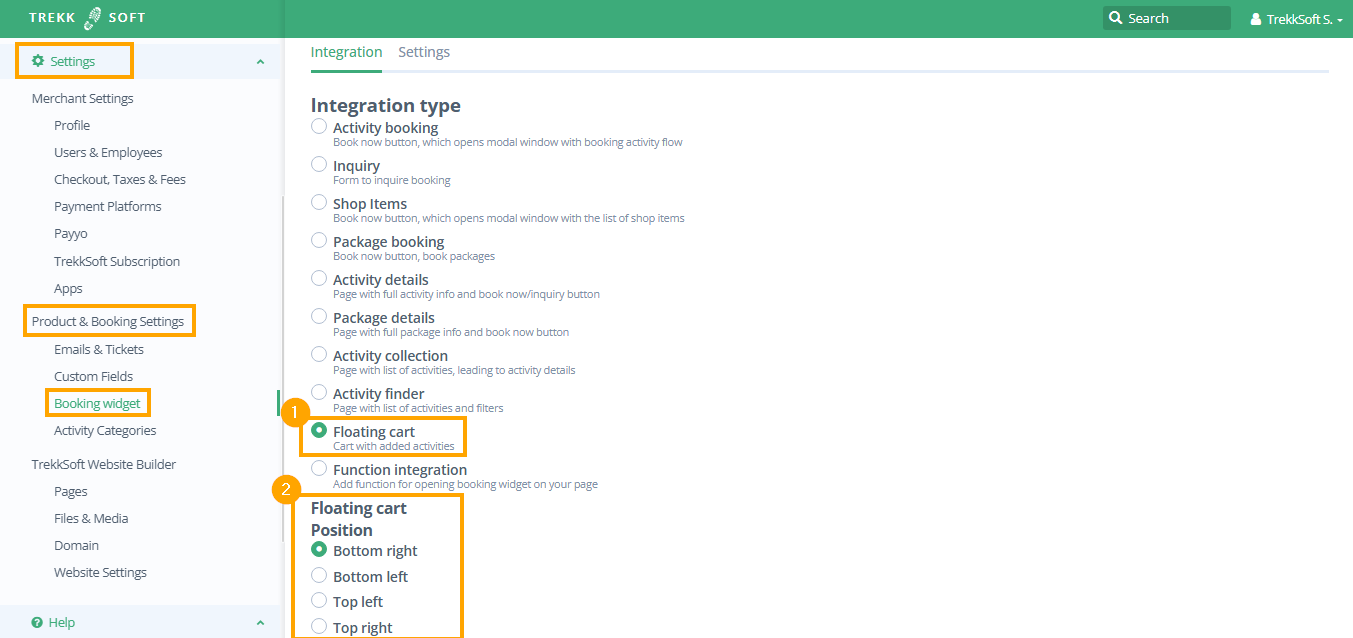
Floating cart Integration type
This integration is useful if you would like to see the cart with added activities on a page on your website where there is no booking widget integrated like the Home page, Contact us page.
How to set up
- To start, go to your Backoffice and then navigate to Settings > Product & Booking Settings > Booking widget. From the Integration type section, select the "Floating cart".
- Now, from the Position section, select the desired position of the cart on your website.
NOTE! Please make sure to add a Booking widget to a page on your website before integrating the floating cart widget type.
TIP 1: Floating cart widget works in the combination with a book now button. So make sure to add a book now button on a page on your website before integrating this widget type.
TIP 2: Add the floating cart widget script on all the pages of your website where there is no Book Now button to keep track of the pending booking in the widget.
TIP 3: We recommend adding the floating cart widget script in the footer or header section of the website to reflect it throughout the website.
TIP 4: A floating cart option is available with each type of widget that can be enabled or disabled from the Additional option. Get more details about this option here.
How to Integrate the Floating cart Integration type?
See the GIF below showing how to integrate it and how it works.
________________________________________________________________________
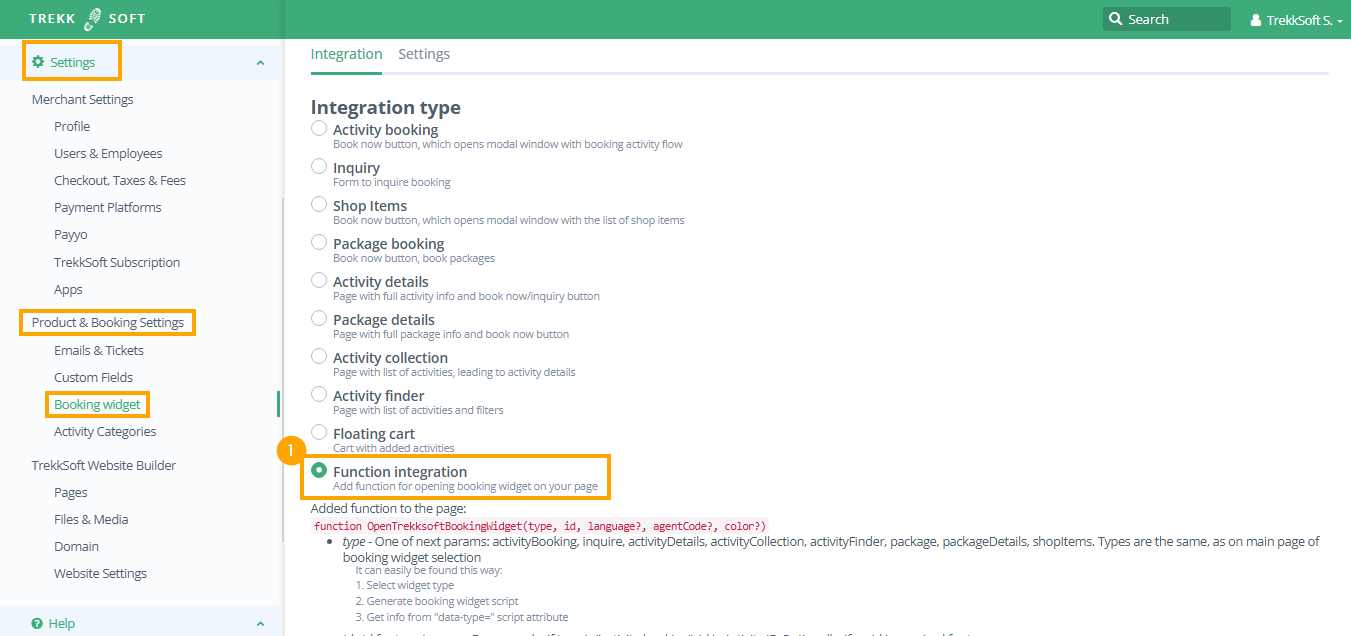
Function Integration type (For Advanced user)
This integration is for Advanced users who have a good knowledge of coding (HTML/CSS/JS). This integration type is used for adding a function to open the booking widget on your website.
How to set up
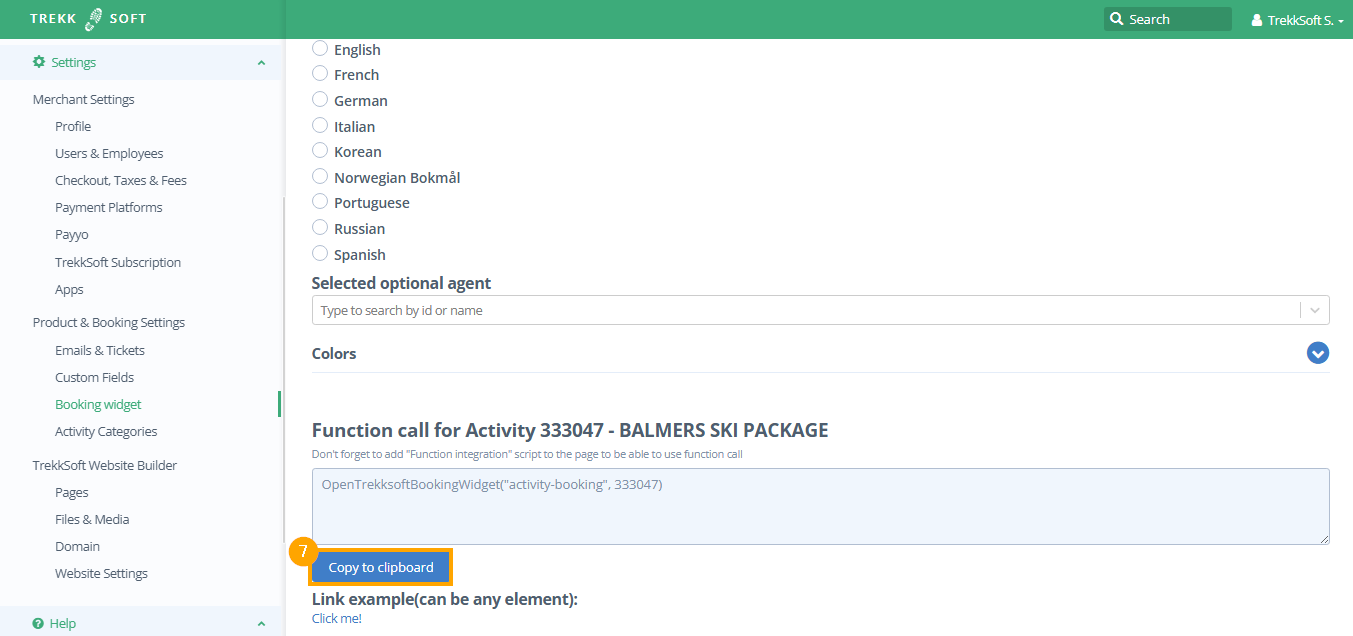
- To start, go to your Backoffice and then navigate to Settings > Product & Booking Settings > Booking widget. From the Integration type section, select the "Function integration".
- Copy the function Integration script.
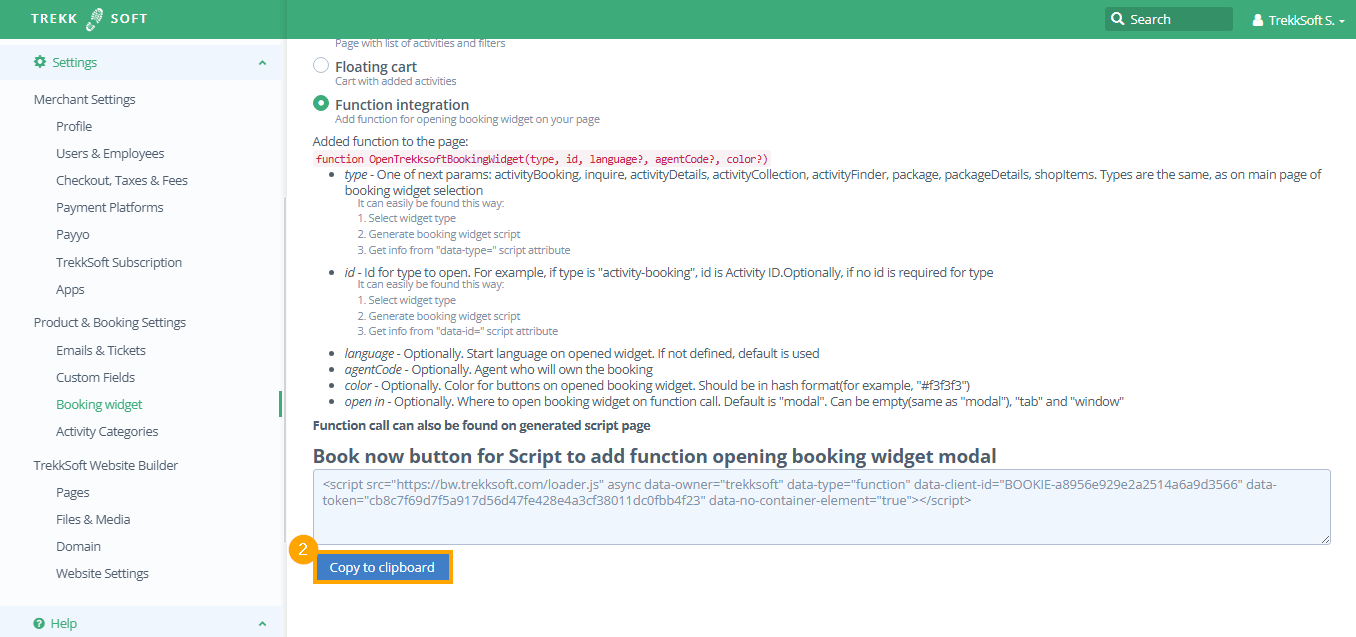
- Paste the script code into the header or footer section of your website or the page where you would like to integrate the function type widget on your website.
- Go to the Integration type section, select the desired type like Activity booking, Inquiry, Shop Items, Package booking, Activity details, Package details, Activity collection, activity finder.
- Select the desired activity/package/shop items/collection based on the selection in point#4 above.
- Go to the Additional option, under Integrate widget as, select Function.

- Now go downwards and you will see a Function call that you can use with a button code on your website.
Sample code that can be used on your website for the Function call to work properly!
<button onclick="OpenTrekksoftBookingWidget('activity', '61809', 'ru', 'agent-111779', '#f44336')">Show</button>
NOTE! Please make sure to add the Function Integration script to the header or footer section of your website to work the Function call properly.
How to Integrate Function Integration type?
Please see the GIF file below showing how to integrate this type and how it works.