
Learn more about our POS (Point-of-Sale Desk), how to use it and how it can be useful for you!
Last update [Feb 4, 2023]
TrekkSoft offers a range of booking tools to help you expand your distribution through multi-channel sales. We have the Channel Manager (or ExperienceBank), the Mobile App, and of course, the POS Desk.
All these tools work together to boost sales online and over-the-counter, and are geared towards improving the efficiency of your overall sales and booking process.
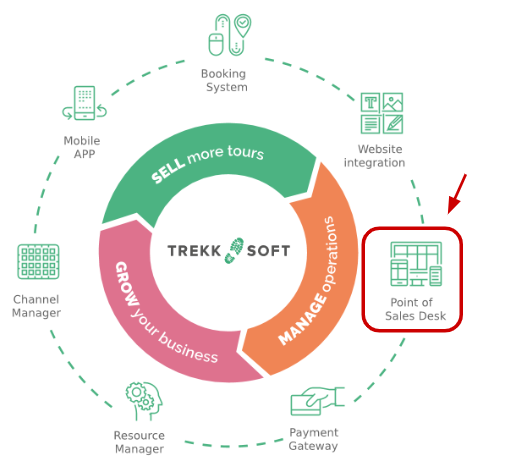
The Point of Sale (POS) Desk gives your sales team a straightforward and easy-to-use tool to seamlessly process walk-in bookings.
________________________________________________________________________
In this article, we will go through the following topics to help you understand how the POS Desk works:
________________________________________________________________________
What is a POS Desk? |
|
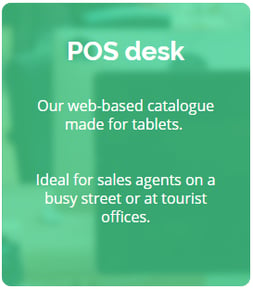 |
The Point-of-Sale Desk was created to deliver a great booking and marketing tool for your sales team, travel partners, and resellers. The POS desk is easy to use, allowing your resellers to use it without any training. Get real-time updates on your latest availabilities, upsell customers with add-ons and take partial or full payments in-person. During a tour, pull up details on upcoming bookings and get all the information you need about your guests. |
|
You can also use the POS Desk on a tablet or laptop as an activity booklet to display trip information like your tour itinerary, maps, and pictures of your tours. |
|
_______________________________________________________________________
POS Desk designed for whom?
Our Product team imagined the POS Desk to be used by hotel concierges or hotel receptionists who usually recommend "things to do" to their guests. This is a great opportunity to resell local tours and activities so why have a tool to facilitate this process?
Some companies have used it as a self-serve kiosk where customers could just browse through the activities on their own without having to wait in a queue to speak to a sales agent.
Use the POS Desk at any point of sale to deliver a great experience from the very beginning!
________________________________________________________________________
POS Desk Overview
The POS is made up of five sections (click on any option to jump to that section):
Watch the video below for a quick preview of how the POS Desk looks and some of the main features!
________________________________________________________________________
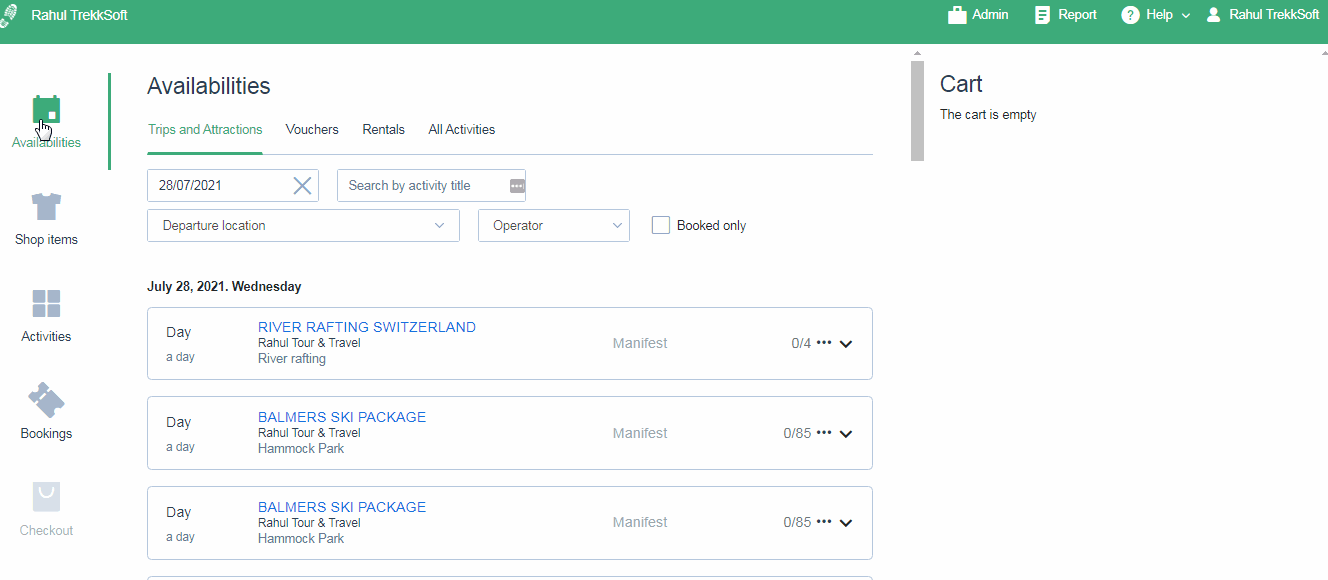
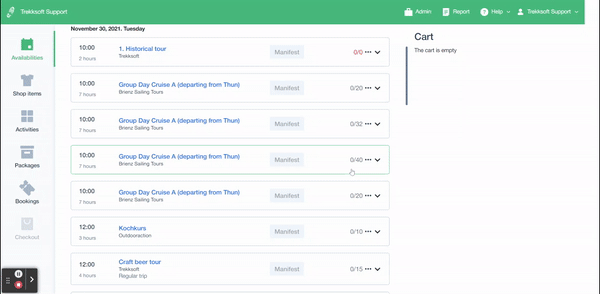
Availabilities
Your availabilities will always be shown in a Calendar View, starting with the next upcoming activity.
You can filter availabilities by:
- Schedule type (Trips and Attractions, Vouchers, Rentals)
- Departure date
- Activity Title (A to Z)
- Departure location
- Operator
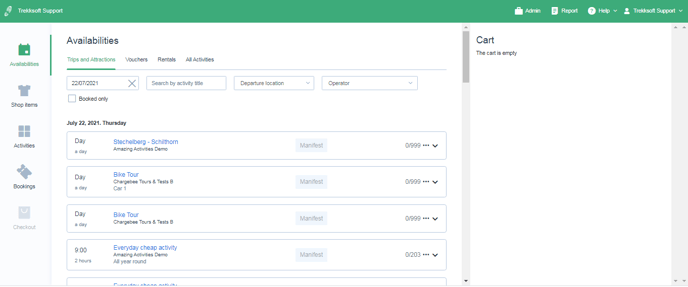
To the right is your cart. Here, you'll have an overview of all the items added to the booking.
Note: Since vouchers are not restricted to a specific date, voucher schedules will show up as the first available departure for every date.
What additional tasks you can perform from the Availabilities section?
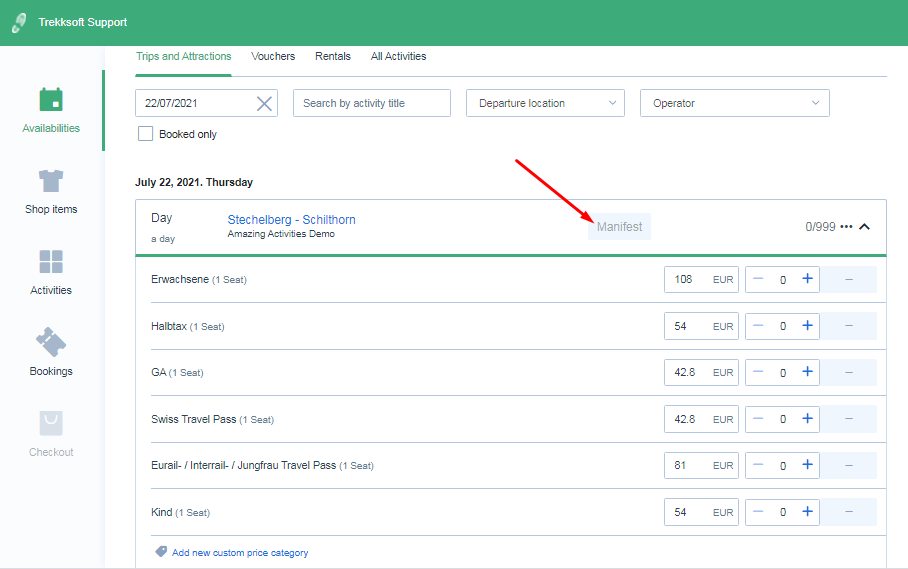
- Check Manifest: From this section, you can also access the passenger list (or guest manifest) by clicking on the "Manifest" button on the left.
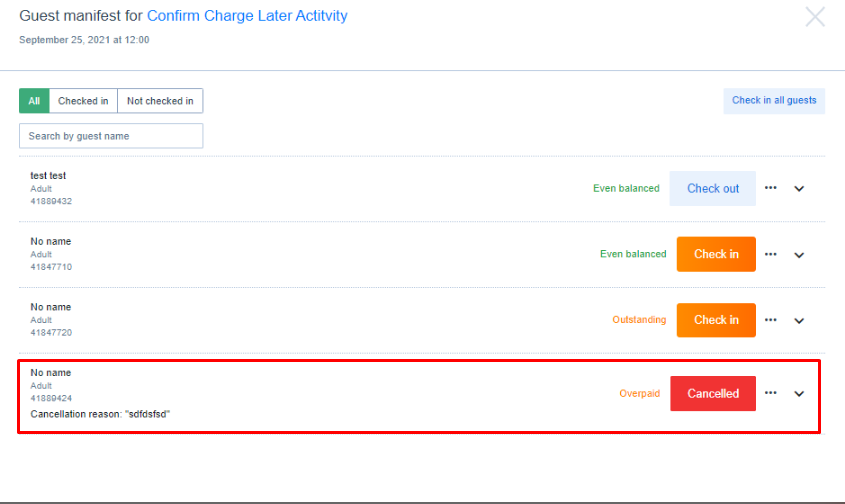
- POS Guest Manifest: Guests appear in order of booking. First booked (time wise) on top. If you then change balance or the check-in status, it will order it like this:
- Checked-in always on top
- Even balanced/ not checked-in
- Outstanding/ not checked-in
- Cancelled
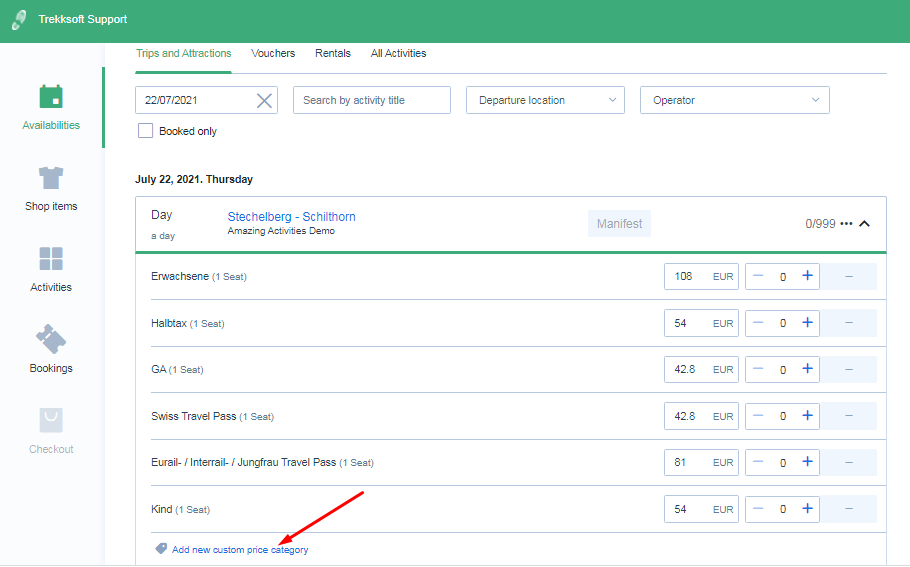
- Add a new custom price category: You can add a custom price category for your customers. For example, you would like to provide a special price for some particular guests.
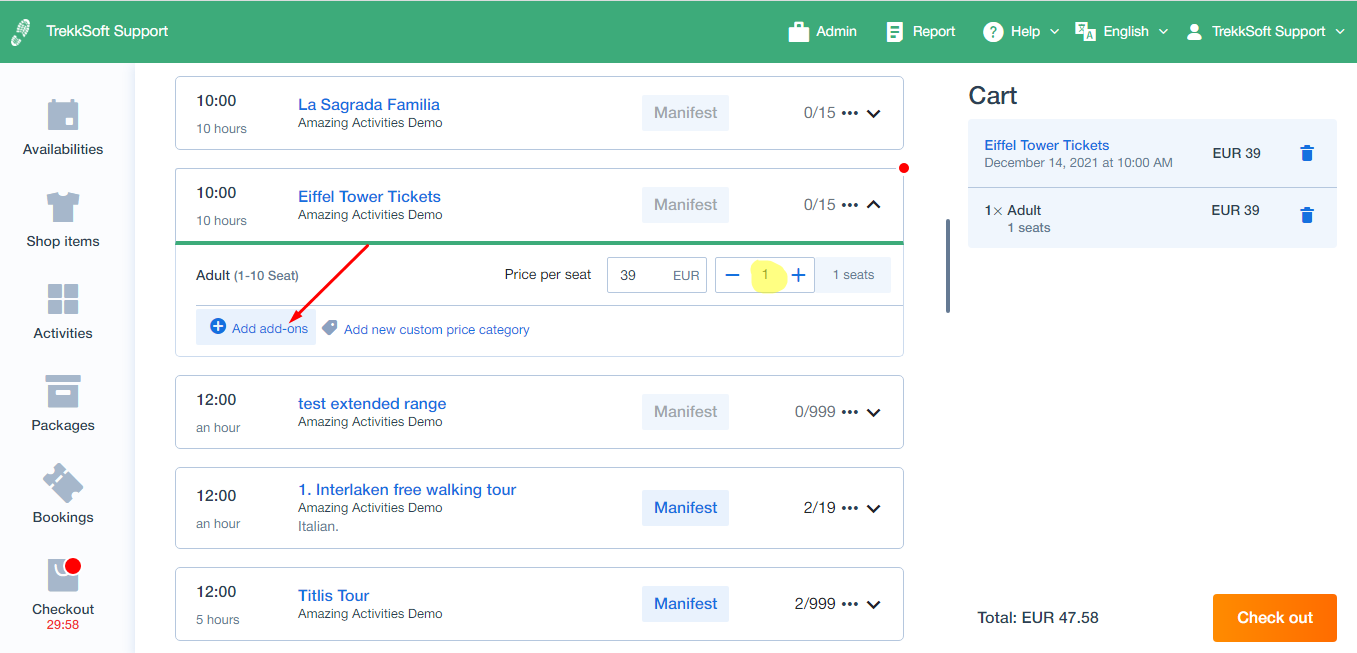
- Add-ons on POS are now already visible as an inactive field and turn active as soon as one seat was added.
________________________________________________________________________
Shop Items
Here, you'll find all the shop items you have created and can sell them directly from the shop dashboard (as shown below).
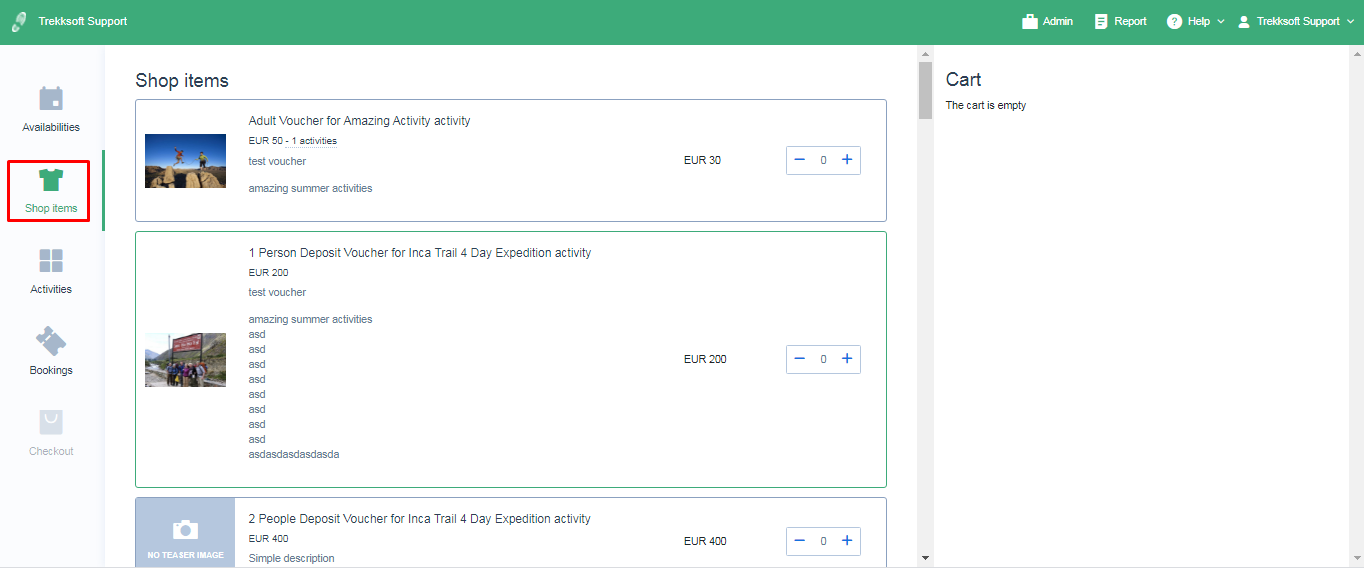
You can click on the + sign to add a shop item to the cart or the - button to remove it.
________________________________________________________________________
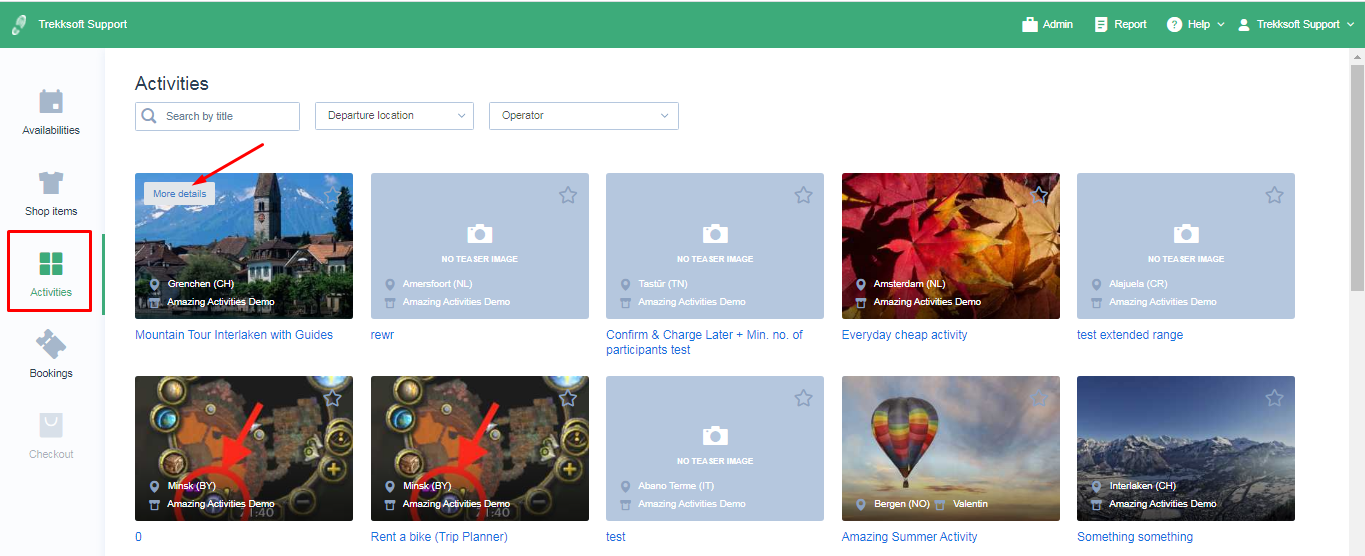
Activities
Here you'll find a list of all activities created in your Admin Desk. Click on any activity to start the booking process, or click on 'More Details' to get a detailed description and view images of each activity.
You can filter your activities by any of the following:
- Activity title
- Departure location
- Operator
________________________________________________________________________
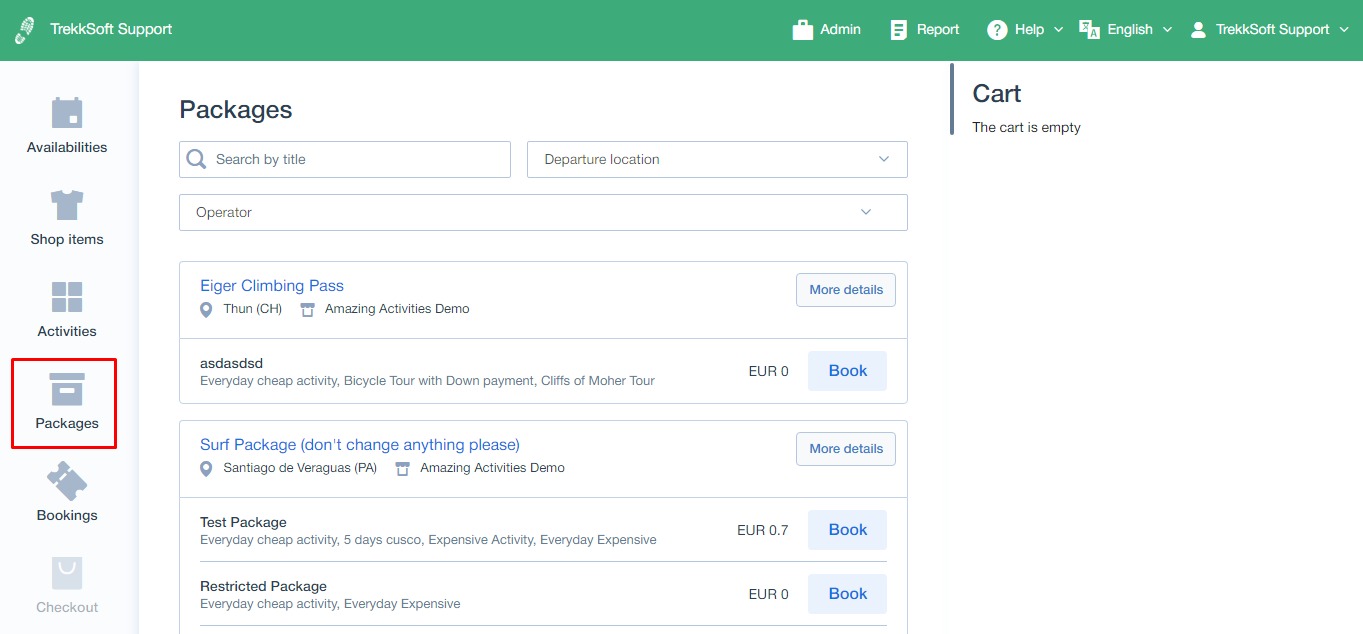
Packages
Here you'll find a list of all packages created in your Admin Desk. Click on any package to start the booking process, or click on 'More Details' to get a detailed description and view images of each package.
You can filter your packages by any of the following:
- Package title
- Departure location
- Operator
________________________________________________________________________
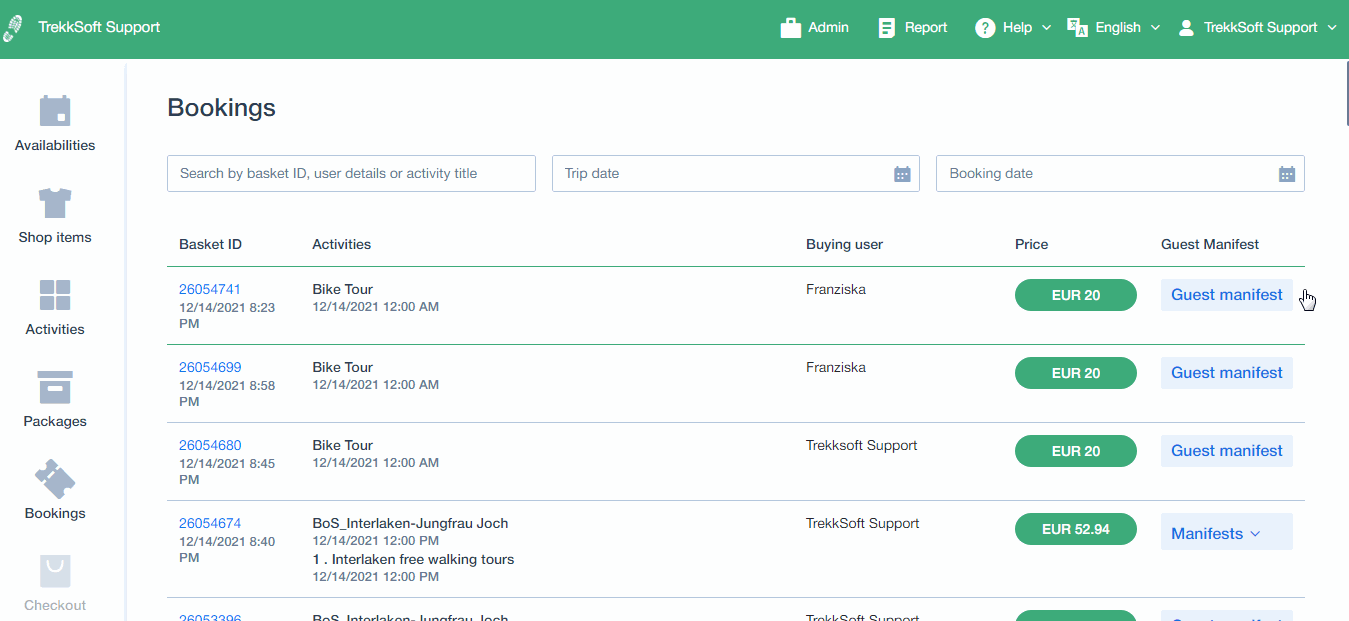
Bookings
The bookings tab shows all your recent bookings. You can filter bookings by:
- Basket ID, user details, or activity title
- Trip Date
- Booking Date
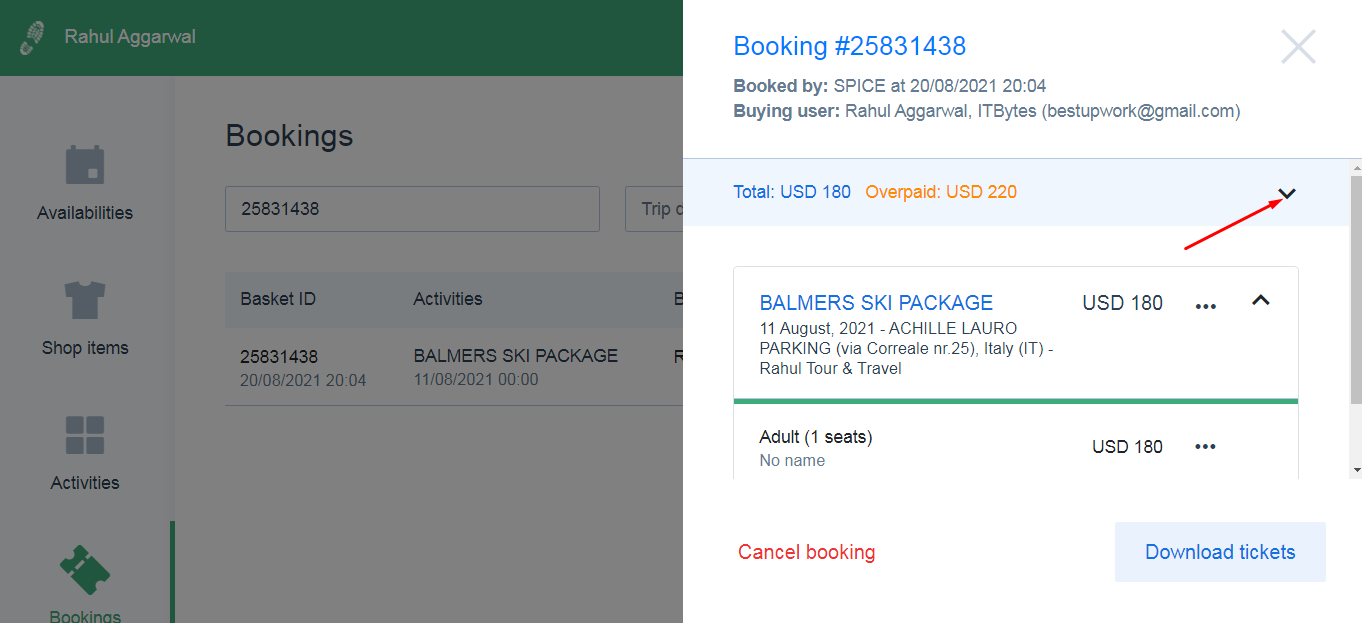
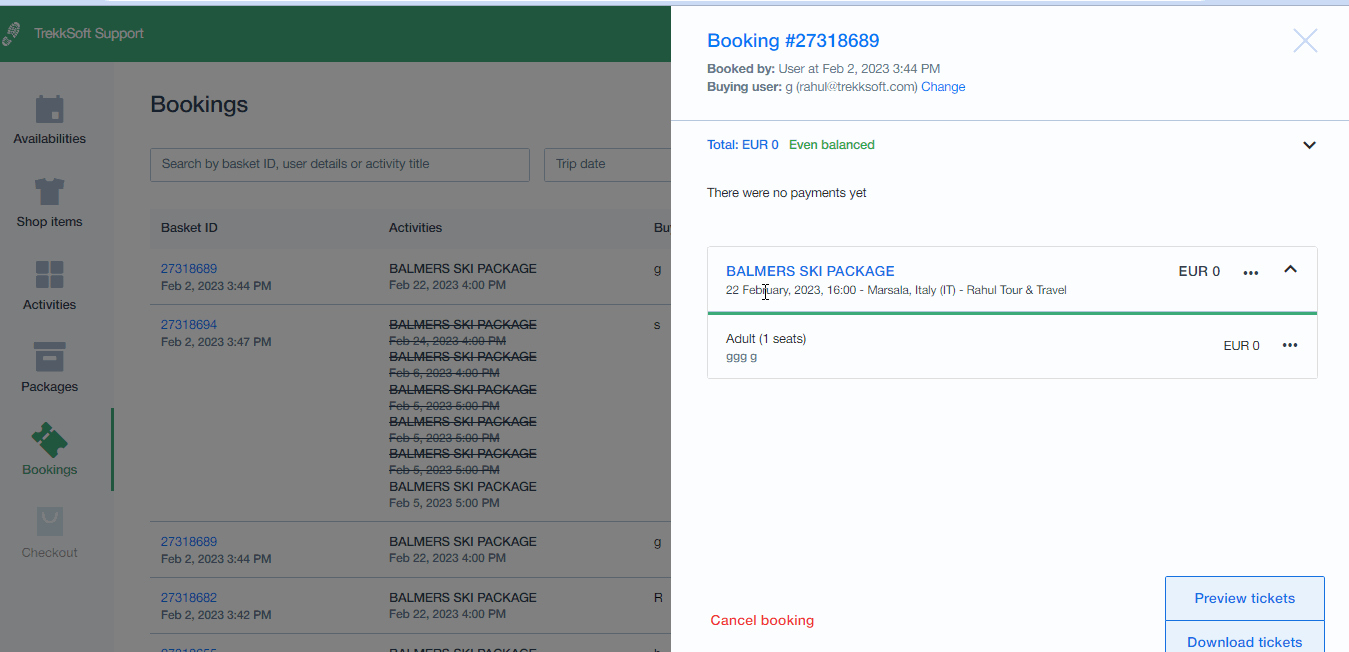
From the list of bookings, you can click on any booking to download tickets, remove guests, check the full details of the booking (guest names, etc) or cancel the entire booking. You can also rebook guests or rebook activities, as well as access the guest manifest.
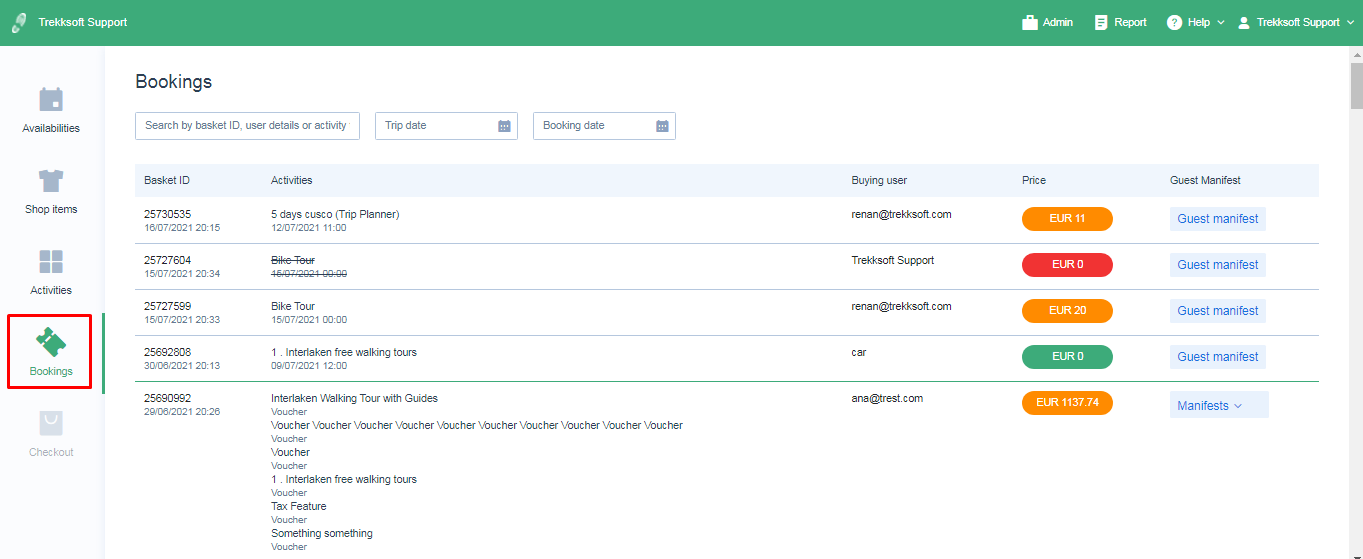
What different color code means?
You'll also notice that each booking Price is now color-coded. Here's what the colors indicate:
-
- Green - Even balance
- Red - Cancelled booking
- Orange - Outstanding payment or Overpaid
- Purple - Unconfirmed booking
Download Tickets
To download tickets for a booking, follow these steps:
- On the left-hand menu click on Bookings
- Then choose the booking you wish to view by clicking anywhere on the booking information. A popup window will open.
- In the popup window, scroll to the bottom and click the Download tickets button.

________________________________________________________________________
How to refund guests?
Follow the steps given below to issue a refund to your guests.
- Go to the Bookings section.
- Search for the desired basket.
- Click on the related basket to see the basket details.
- Proceed as shown in the screenshots below.
________________________________________________________________________
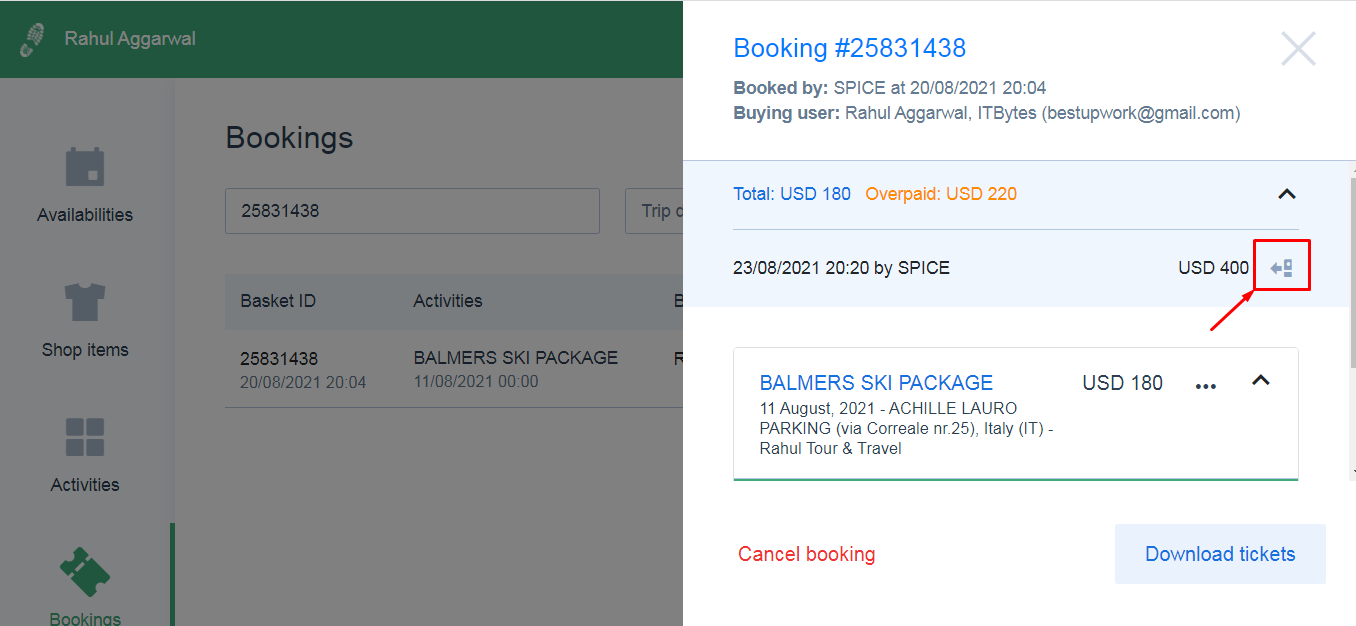
How to rebook guests?
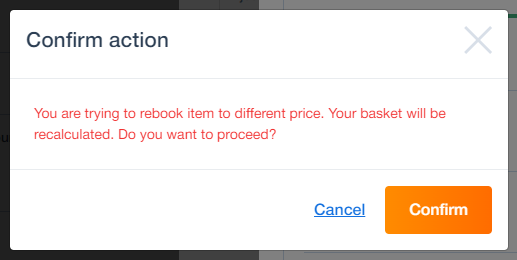
- Rebooking to same activity but different price category: If the price is different, the price will be recalculated so that the basket status is shown correctly (overpaid or outstanding). If you rebook to a different price category you will see a popup asking if you want to proceed and recalculate prices.
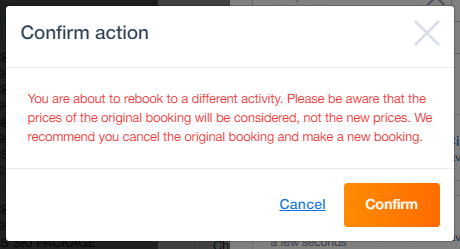
- Rebooking to the different activities: Here, it will still consider the original prices and categories (no recalculation here). Here, we just have too many different use cases. Workaround: Just rebook on guest level or rebook all to the same price category.
- Rebooking to the same activity (schedule and price category): We limited rebooking on POS. Right now you can only rebook on an overall level (upper rebook button) when the price categories do have same IDs (same activity + schedule). For all other cases, you can rebook to one price category (rebook in drowdown), or directly rebook on guest level.
- One of the next steps is that we'll also review how the rebooking is done on the admin desk and change it accordingly.
Warning! Please be aware that the prices of the original booking will be considered and not the new prices. We recommend you cancel the original booking and make a new booking.
________________________________________________________________________
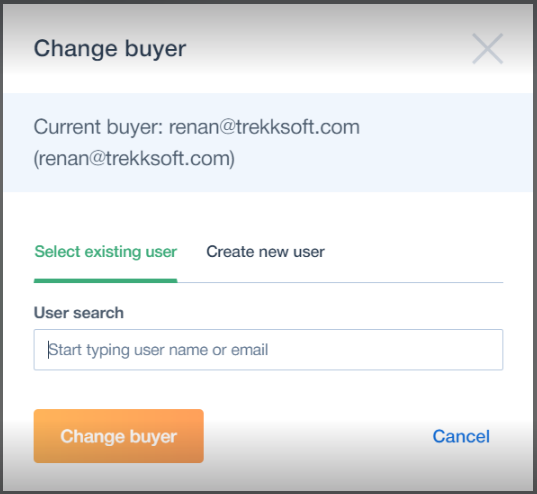
Changing buying user
To be able to send out a payment link, you need eventually to change the buying user. This functionality was added on top of the Booking detail section. Here you can change it by searching for an existing one or by creating a new one.
________________________________________________________________________

___________________________________________________________________
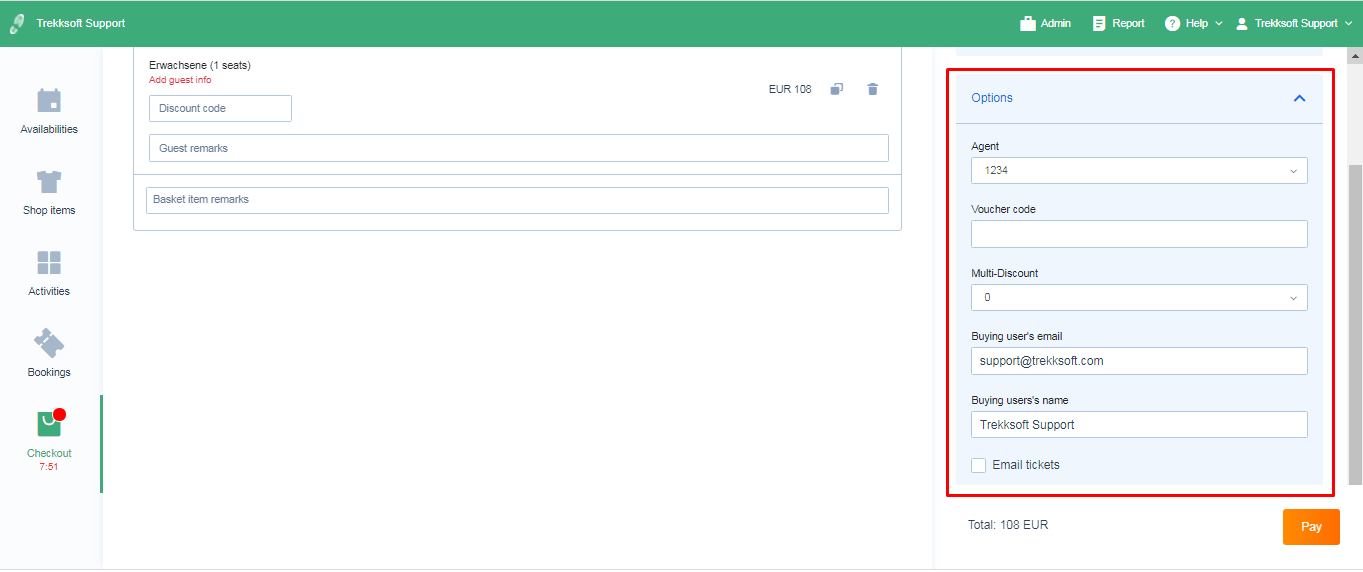
Checkout
On the checkout page, you can see an overview of your booking. Here, you'll get the chance to modify the booking, add guest details, change agent, add a discount code or package discount or change the buying user.

In the Checkout section, you have the following options:
-
- The ellipsis button (3 dots) - Click this option to edit or delete the current booking
- Recycling Bin - Click this icon to remove the booking. You will receive a warning to make sure you wish to delete the incomplete booking.
- Discount Code - Enter a discount code in this field to add a percentage reduction to the total price (find out more about discount codes here)
- Guest Remarks - Enter any information the guest wishes you to make note of e.g. dietary requirements
- Basket Item Remarks - Enter any additional comments you wish to add to the basket (This will only be visible inside the basket once the booking is complete)

In the Cart section, you have the following available options:
-
- Agent - Select the agent from the dropdown who is completing the booking
- Voucher Code - Enter a voucher code if the guest wants to use a voucher discount
- Multi-Discount - If the activity is part of a package discount, the information will appear here
- Buying Users email - This field is filled automatically but you have the option to manually edit if necessary
- Buying Users name - This field is filled automatically but you have the option to manually edit if necessary
- Email tickets - Check this option to send emails to buyers containing tickets.
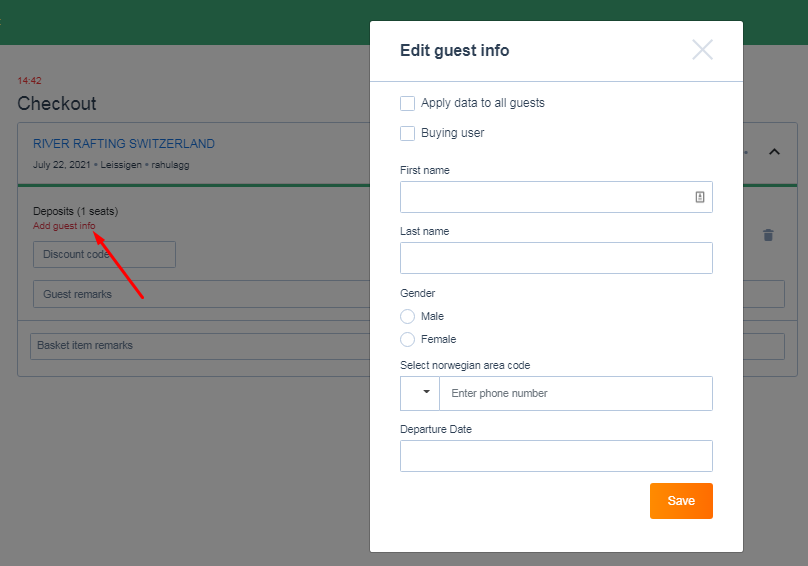
During Checkout, click Add quest info (in red) to bring up a popup for guest info. You have the following available options:
-
- Apply data to all guests - Mark this box if you want all the guests to have the same personal info.
- Buying user -Mark this box if the personal info you are inputting is for the person who is ordering the ticket and is the person of contact for managing the booking i.e. Tick this option if you want the Logged in user as Buyer.
- Gender - Choose Male or Female.
- First name - Please write the guest's first name.
- Last name - Please write the guest's last name.
________________________________________________________________________
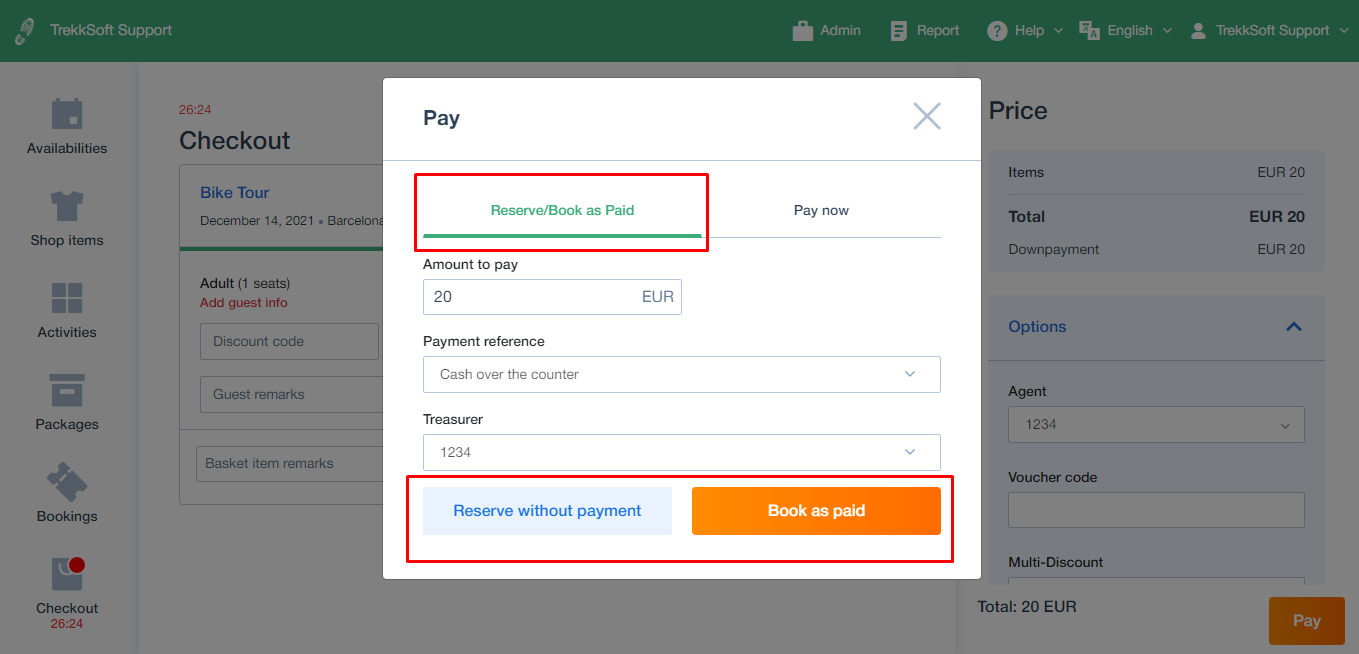
What are the available payment options?
During Checkout, click the Pay button to bring up a popup for payment options. You have the following available options:
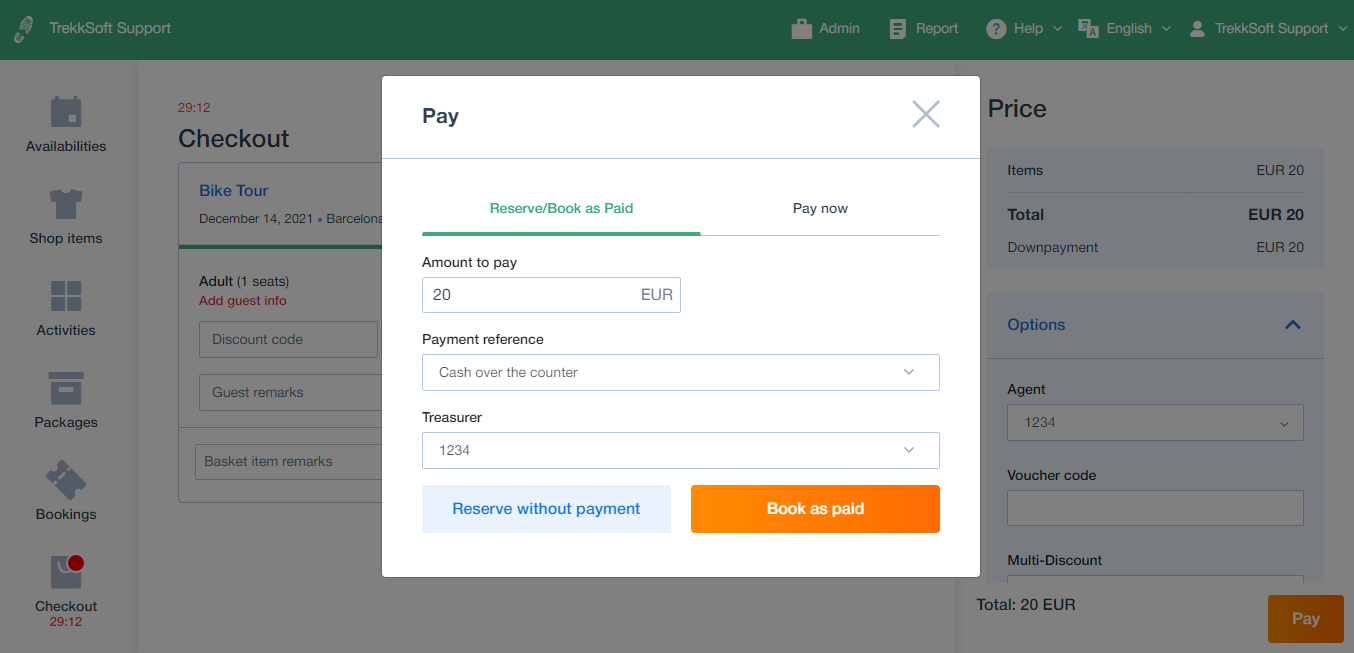
-
- Reserve/Book as Paid - You have two options here to mark the booking. Reserve without payment and take payment later via the payment link or Take cash on the counter and Book as Paid.
- Reserve/Book as Paid - You have two options here to mark the booking. Reserve without payment and take payment later via the payment link or Take cash on the counter and Book as Paid.
-
- Pay now - Pay now with our HPP option which provides more payment options to pay. Get more details on HPP here.

- Pay now - Pay now with our HPP option which provides more payment options to pay. Get more details on HPP here.