Download our mobile App (mPOS) from the App Store or Google Play and benefit from several new functionalities.
Last update [Dec 5, 2023]
Getting started
We’re delighted to announce our new TrekkSoft mobile App - the mPOS. It is now available in the Play Store and App Store.
You can download the new TrekkSoft App in addition to the existing App. You'll see that they both have different icons.
Existing App: 
New App (mPOS): ![]()
- ________________________________________________________________________
Here is what we'll cover in this article:
What’s new about the mPOS?- Availabilities
- Shop items & Rentals
- Rebook items and guests
- Custom Price Category
- Guest Manifest
- Check-in and check-out guests
- Validate tickets
- Available Payment Options
- Working with Credit card scanner
- Working with Credit card reader and Printer
- Bookings
- How to refund guests?
- How to add payment?
- How to create payment link?
- How to change buyer?
- Daily Cash Report
- App Settings
- Login functionality for several accounts
- Scanning one ticket and decide which guests of the same booking to check-in
- Give us your feedback
- ________________________________________________________________________
What’s new about the mPOS?
Better user experience
We added a couple of things that improve the overall user experience:
- Easy navigation
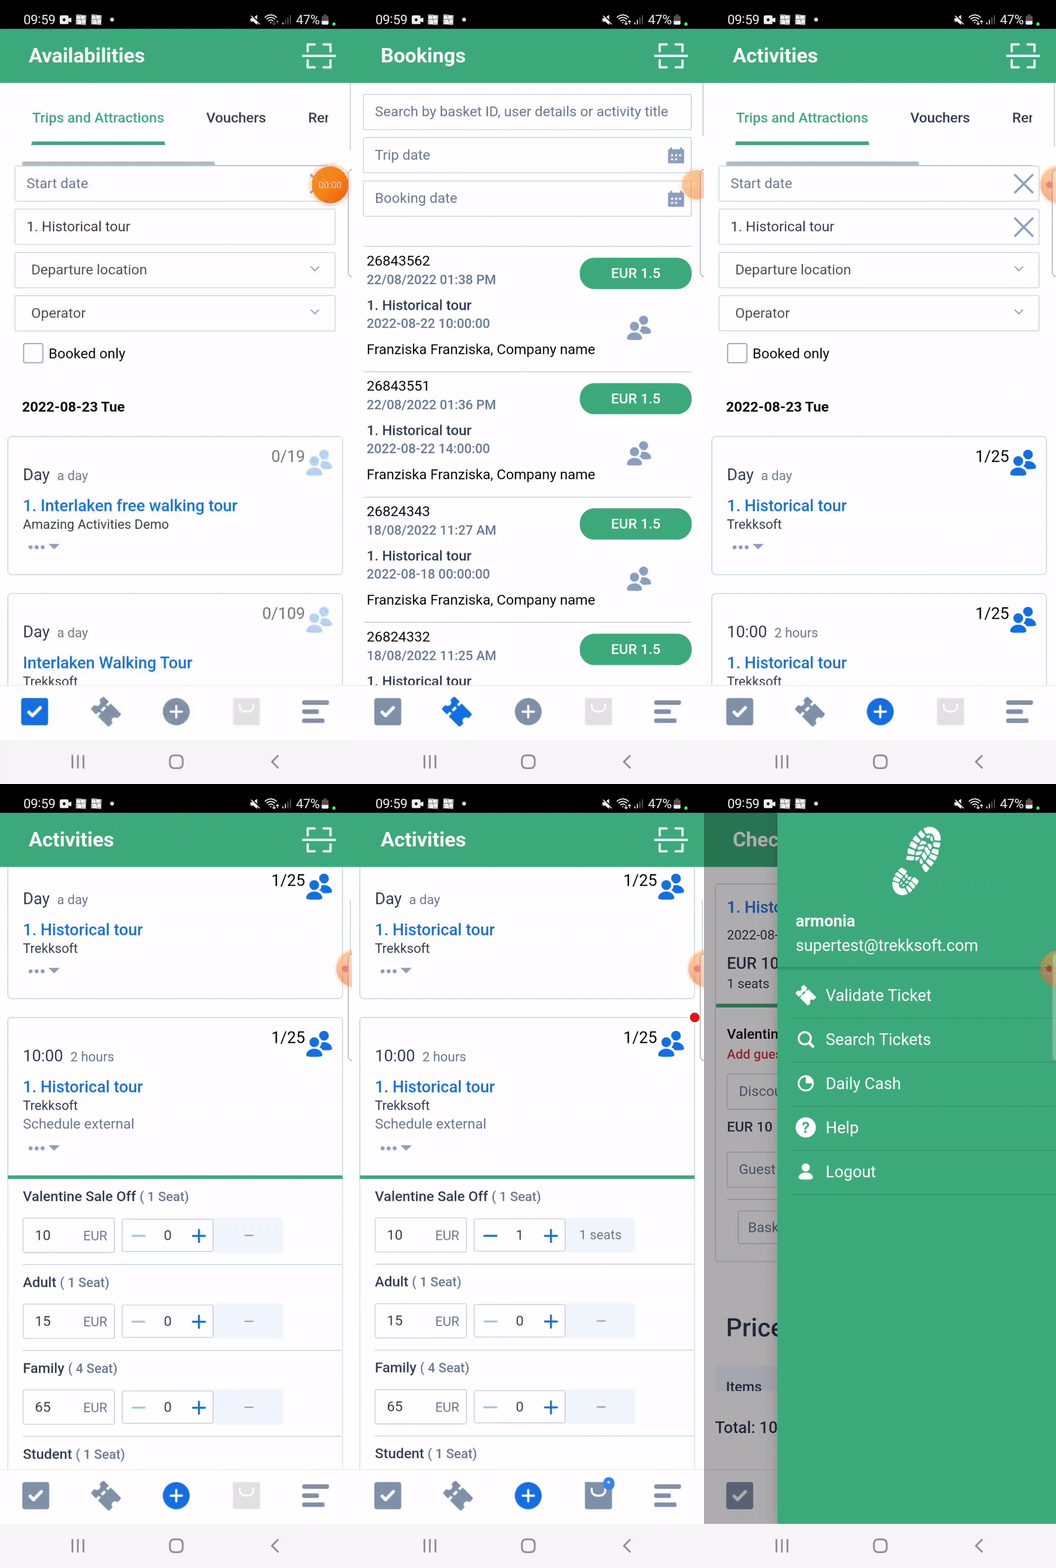
Easily navigate between the different icons at the bottom of the page:
- Checkmark icon: Availability list
- Ticket icon: Booking list
- Plus icon: to book activities or shop items
- The shopping cart icon: not active by default, becomes active as soon as you add something to the cart
- 3 bars icon: Menu with: Validate Ticket, Search Tickets, Daily Cash, Help, Logout.
- Also in the menu you find the merchant's name and email address at the top
- Aligned to the Point of Sale-Desk
The mPOS is more aligned to our existing Point of Sale Desk (POS) in terms of design and functionalities. This gives us the advantage to release new features for the Point of Sale and shortly afterward as well for the mPOS.
- Visuals
We added pictures for activities, shop items, and add-ons to illustrate In the booking part you an easy search for basket ID, user details, or activity title
- Fewer clicks
Instead of opening every action in a new window, the mPOS is now using more dropdown menus so you stay on the same page to click a certain action (e.g. adding guests). Only for more complex actions, e.g. adding add-ons, we open a new window.
________________________________________________________________________
Availabilities
This is the fastest way within the app to make a booking.
To fully get the advantage of this functionality, you should have a TrekkSoft card reader nearby, this way you won't have to type CC information manually.
From this view, you have a list of the activities with the availabilities for bookings.
The main information you get is:
- Schedule type (Rentals, Voucher, Trip/Attraction)
- Duration of the tour
- Time of the activity
- Name of activity
- Occupancy
Additional tasks you can do from this view:
- Filter activities based on schedule type (Trips and Attractions, Vouchers, Rentals)
- Filter activities based on the date
- Search a particular activity by activity title
- Filter activities by departure location of the activity
- Filter activities based on Operators (if you are sharing activities by Partner Network)
- Filter Booked trips only
- Filter Bookable trips only ________________________________________________________________________
Shop items & Rentals
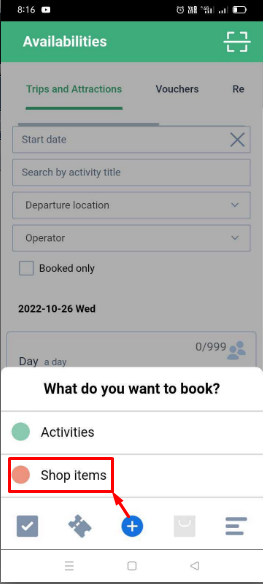
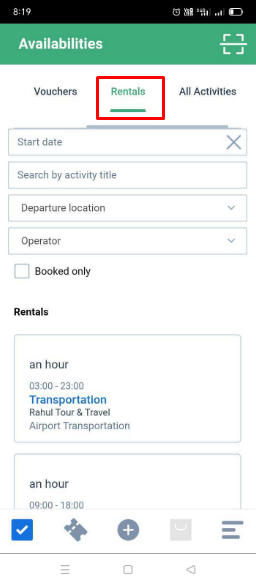
Booking of shop items as well as rental schedules are now available in the mPOS. This means you and your team can book a bigger variety of items and also upsell customers on-site not only with additional add-ons, but also shop items - everything in one cart - booked in a few steps.
- ________________________________________________________________________
Rebook items and guests
In the mPOS, you can now easily rebook booking items as well as single guests. A huge time saver is that, if you have a booking with 2 adults and 2 children, you don’t have to rebook those per price category, you can simply just rebook the whole basket and it will take over the specific price categories for the new date.
- ________________________________________________________________________
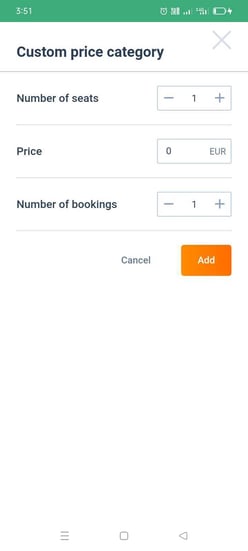
Custom Price Category
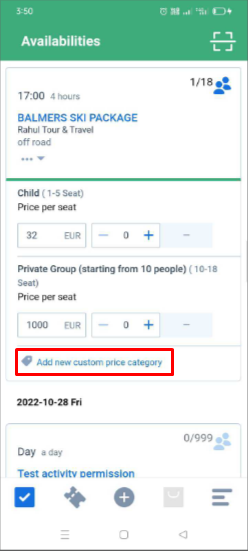
In the new mPOS, you have the option to add a new custom price category for a certain availability.
- ________________________________________________________________________
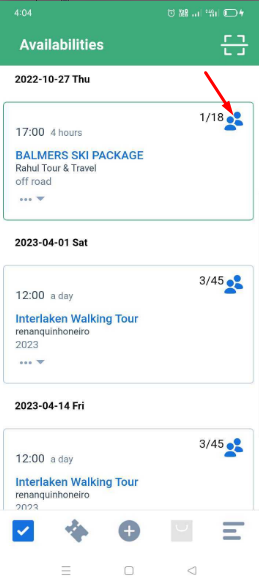
Guest manifest access
Simply click on an active (blue) icon in the availability to access the guest manifest. You can also access the guest manifest from the booking itself.
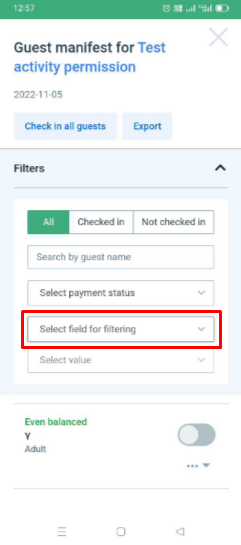
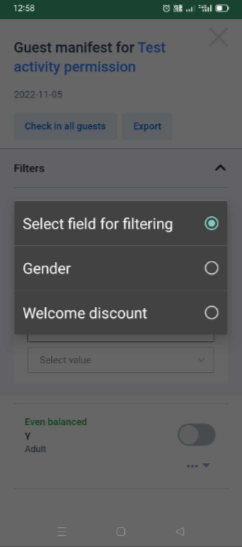
Filter for guest custom fields
Now you can filter guests list by guest custom field from the guest manifest.
Check-in and check-out guests
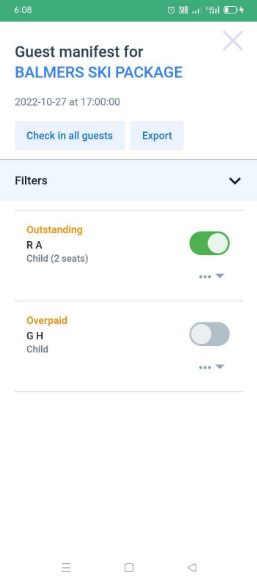
Easily check-in and check-out booked guests directly in the guest manifest. Just toggle the button next to guest to check in or checkout. Or you can directly click on Check in all guests to check in at once.
Validate tickets
You can check-in guests faster by using the "Validate Tickets" option. Here you can either scan a QR-code or enter the ticket number manually. As soon as your ticket is validated the guest will be checked in already in the guest manifest. In the example below, we have validated an already scanned ticket which shows the message that it's validated already.
You can also use the scanner icon available at the top right corner of the app directly to scan a ticket.
IMPORTANT! Make sure the related bookings permissions are enabled for Agents to scan tickets. Checkout agent permission for scanning tickets here (Agent Permissions > Operations > Scan tickets via mobile app (mPOS))
Working with Credit Card Scanner
You can now scan credit card directly from the app using the inbuilt feature of Pay using CC scanner which will automatically validate the card.
Working with credit card reader and Printers
To pair with printer, you just need to turn on the Bluetooth in the printer and then pair from the device you are using with the app (mPOS).
IMPORTANT NOTE! There are 2 devices working currently with the mPOS, iMixPay-BL (CCReader) and Star Micronics SM-230i (Printer).
- ________________________________________________________________________
Available Payment Options
During Checkout, click the Pay button to bring up a popup for payment options. You have the following available options:
-
-
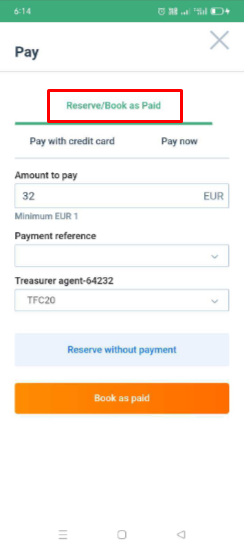
- Reserve without payment / Book as paid - You have two options here to mark the booking. Reserve without payment and take payment later via the payment link or Take cash on the counter and Book as Paid.
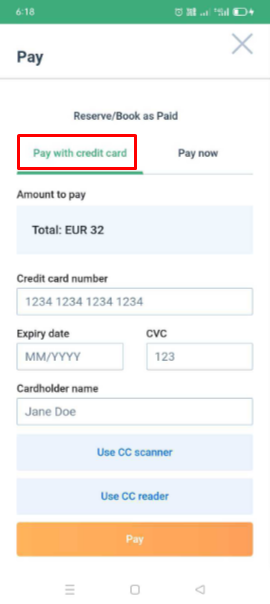
- Pay with credit card - Pay for the booking using the credit card. You can simply use the form and type manually in the credit card details, or you use the credit card scanner or the credit card reader option.
- Reserve without payment / Book as paid - You have two options here to mark the booking. Reserve without payment and take payment later via the payment link or Take cash on the counter and Book as Paid.
-
-
-
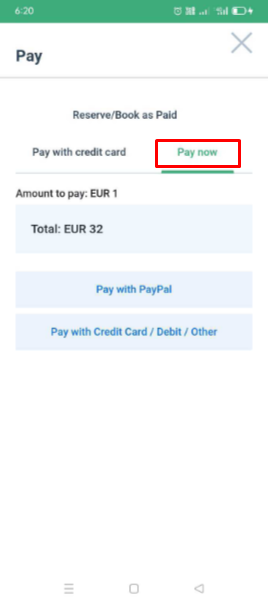
- Pay now - Pay now with our HPP option which provides more payment options to pay. Get more details on HPP here.
- Pay now - Pay now with our HPP option which provides more payment options to pay. Get more details on HPP here.
-
________________________________________________________________________
Bookings
From this view, you have a list of the basket of the bookings.
The main information you get is:
- Basket ID of the booking
- Booking date and time
- Activity title
- Departure date and time of the activity
- Buying user name and Agent name
- Basket payment status differentiating by different colors. Get more details on what different colors means here
Additional tasks you can do from this view:
- Search booking by Basket ID, User details (like name, email, etc,) or Activity title
- Filter bookings by Trip date
- Filter bookings by booking date
________________________________________________________________________
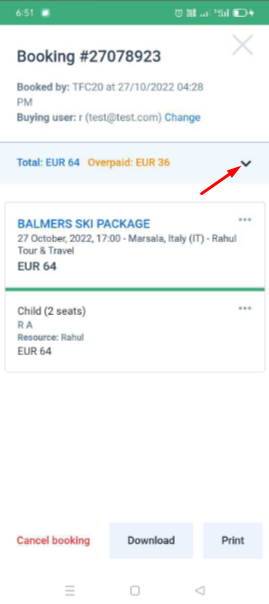
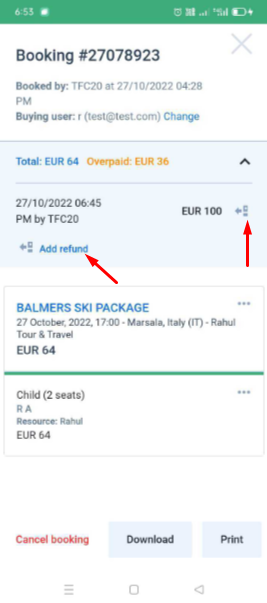
How to refund guests?
Follow the steps given below to issue a refund to your guests.
- Go to the Bookings section.
- Search for the desired basket.
- Click on the related basket to see the basket details.
- Proceed as shown in the screenshots below.
How to add payment?
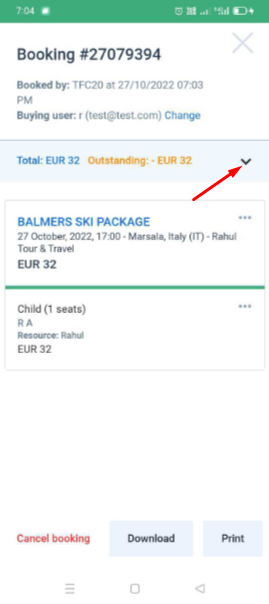
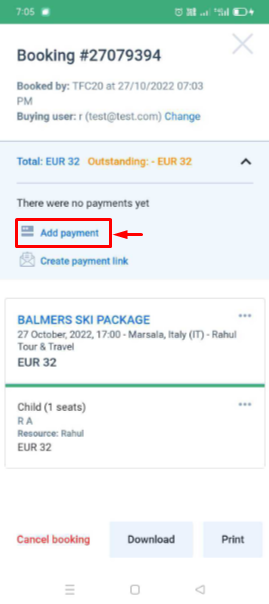
Follow the steps given below to issue a refund to your guests.
- Go to the Bookings section.
- Search for the desired basket.
- Click on the related basket to see the basket details.
- Proceed as shown in the screenshots below.
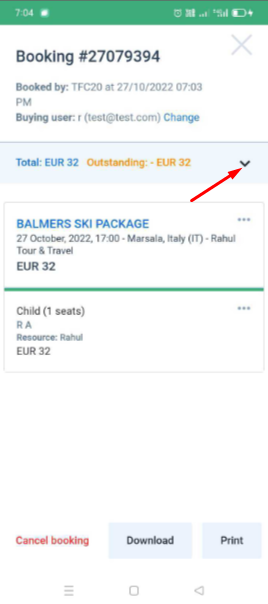
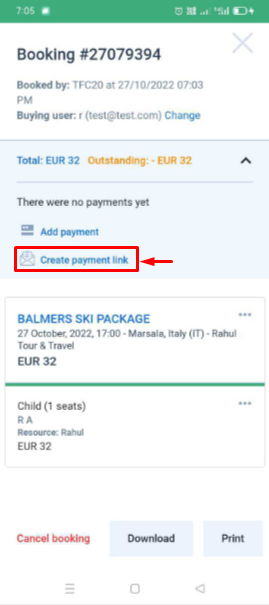
How to create payment link?
Follow the steps given below to issue a refund to your guests.
- Go to the Bookings section.
- Search for the desired basket.
- Click on the related basket to see the basket details.
- Proceed as shown in the screenshots below.
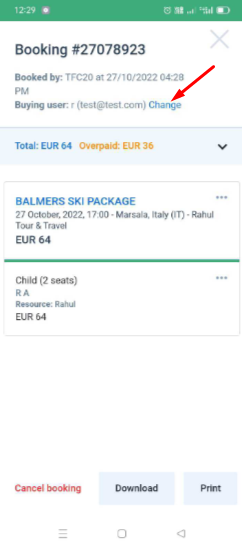
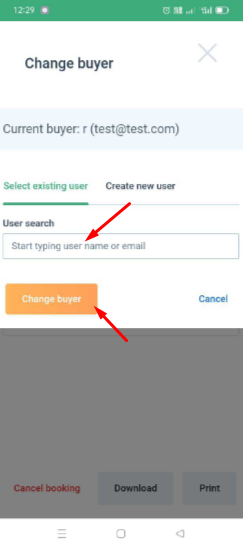
How to change buyer?
Follow the steps given below to issue a refund to your guests.
- Go to the Bookings section.
- Search for the desired basket.
- Click on the related basket to see the basket details.
- Proceed as shown in the screenshots below.
________________________________________________________________________
Daily Cash Report
You can use the daily cash report in the mPOS to see how much money your agents, drivers, or guides have taken in cash on a specific day. This reports show the booking made via mPOS and marked Book as paid at checkout.
________________________________________________________________________
App Settings
We have a menu item for App Settings from where you can set font size, brightness and UI style for the app. See the screenshot below showing the steps to access this setting:
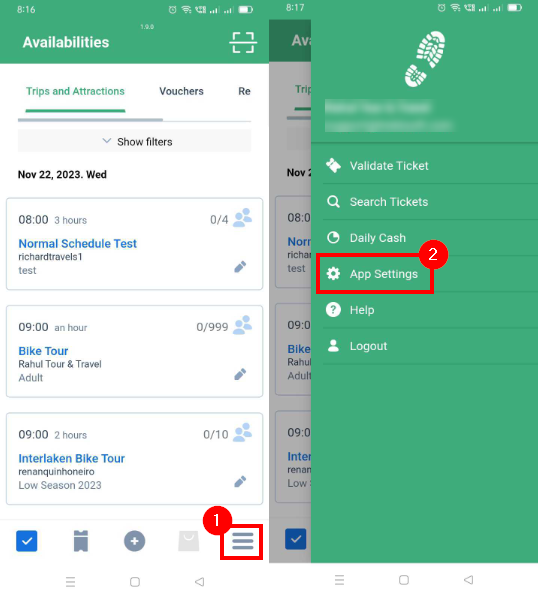
App Settings consists of the following settings:
- Font Size: You can change font size of the app.
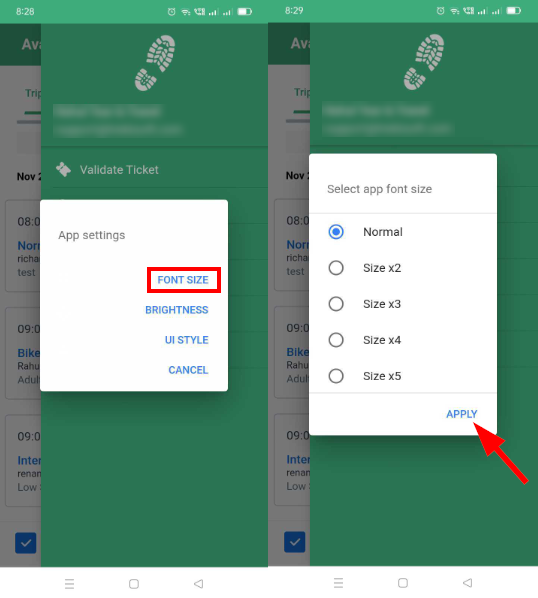
- Brightness: You can change the brightness of the app.
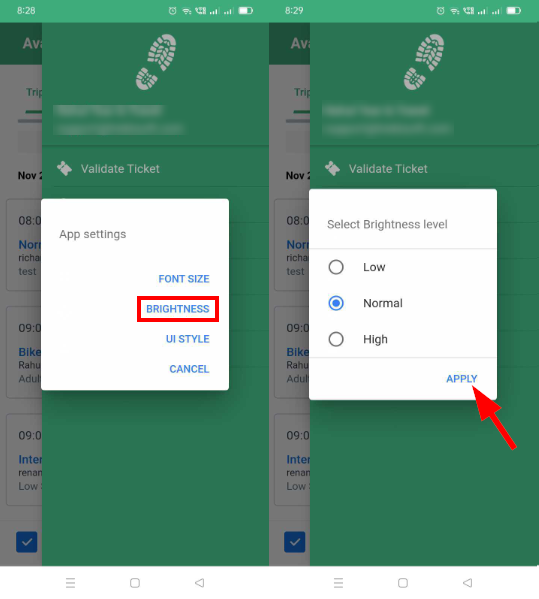
- UI Style: You can change the UI style to Light or Dark mode.
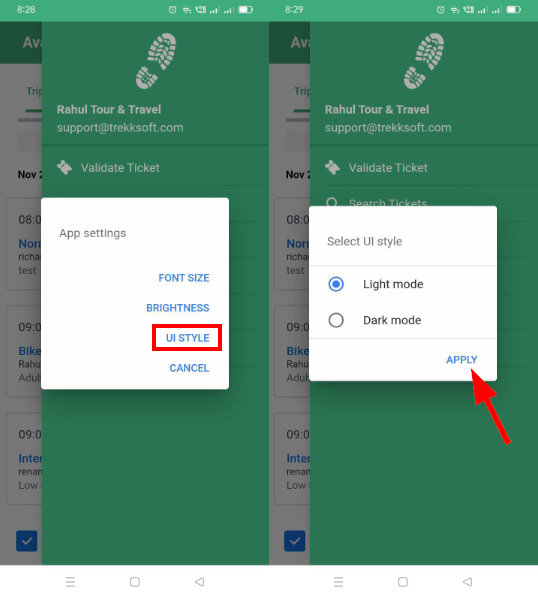
________________________________________________________________________
Login functionality for several accounts
When using several accounts at TrekkSoft with the same user/email address, you can switch between them in mPOS using the scroll option at the top.
________________________________________________________________________
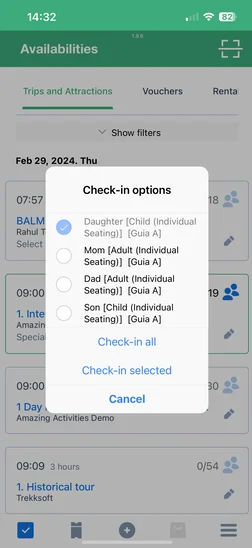
Scanning one ticket and check-in one, several or all guests of the same booking
To simplify the check-in process by scanning tickets, we now added the option to decide, whether you want to check in only one single guest of the booking (of which you scanned the ticket), or to sellect additional guests for the check-in that are part of this booking.
It can be a real time saver if you have a group of people in front of you where one made the booking and you don't have to check-in every single one, but just scan one ticket and check-in all or the ones that showed up.
Additionally, you also see the resource per guest, so if you have a bus (resource) or guide (resource) to where/ whom you have to send the guests to, this is now even easier manage.
Give us your feedback!
If you've tested out the app and would like to share your feedback with the Product Team, please head on over to this form.
