User Accounts & Permissions
Trekksoft has multiple types of user Accounts & Permissions to provide to your users, agents, accountants, etc. You find more information in the article below
Last update [Nov 5, 2025]
Here's an overview of what we cover in this article:
________________________________________________________________________
Overview
The TrekkSoft system has the option to create a multitude of User Accounts. The benefit of this is your employees, agents, accountants, editors, etc can all have their own individual access. Having their own individual access also means they will only be able to access the sections they require. We have the following roles that you can setup for the users:
- Administrator (aka mandator)
- Employee
- Technical Employee
- Accountant
- Agent
- Editor
- Guide
- User without password
________________________________________________________________________
User Role And Permissions
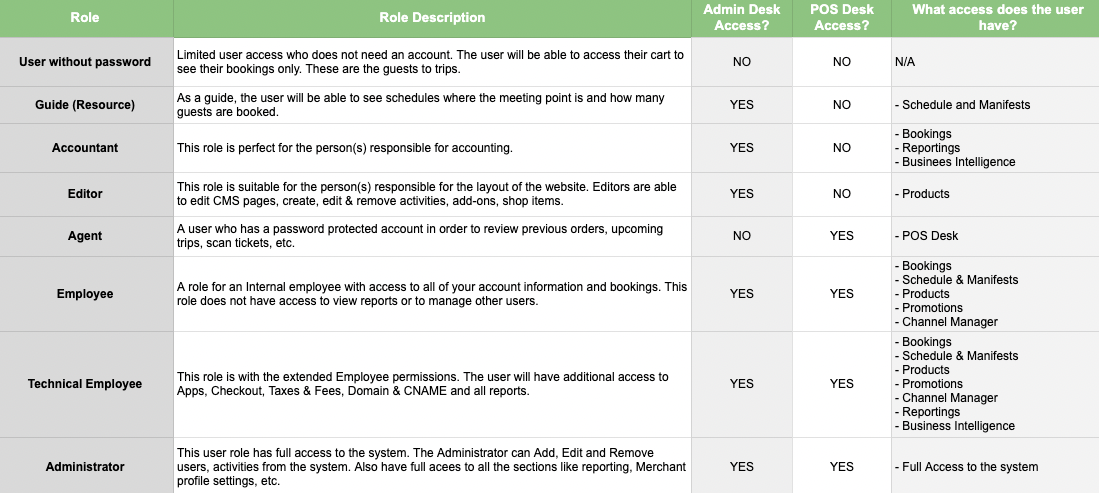
Find the user descriptions and access permission to the system for each user role below:

To get detailed information about the access and permissions of each user role, checkout the article here.
IMPORTANT! To access POS Desk, make sure to assign an Agent to the user role mentioned above. Otherwise user won't be able to access the POS Desk.
________________________________________________________________________
Add A User Account
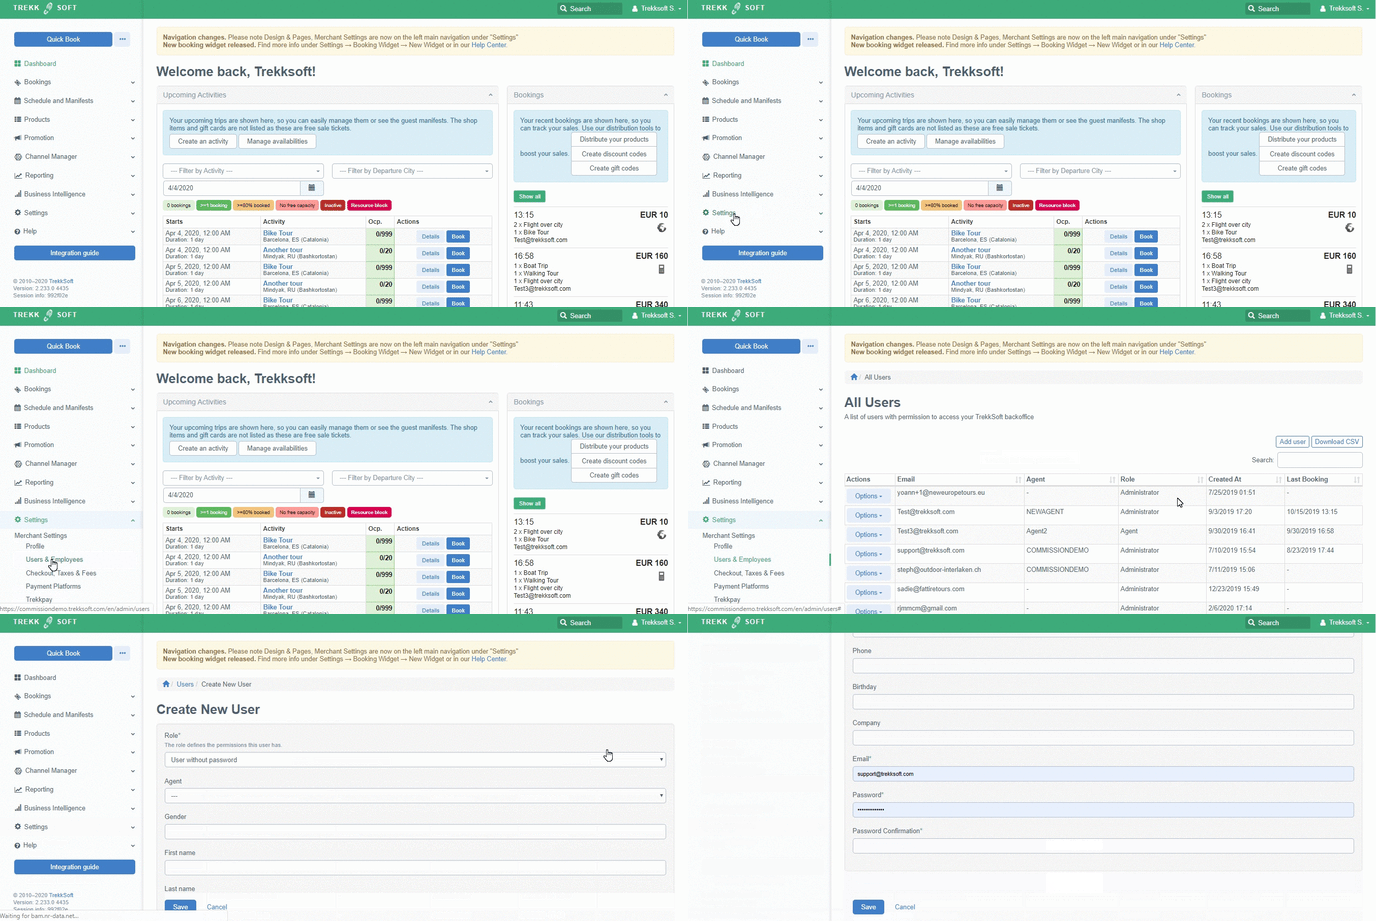
- Go to your Admin Desk (e.g. yoursite.trekksoft.com).
- In the main navigation, click on Settings> Users & Employees.
- Next, on the right-hand side click the 'Add User' button

Complete each of the fields mentioned below to add a new user into the TrekkSoft system:
(Note: Only fields with a * are mandatory although we recommend filling in as much as you can)
| Role* | From the dropdown menu, select the Role you would like the new user to have (There is a full list of the roles and descriptions in the download at the top and bottom of this page) |
| Agent | If you wish to associate an agent, select the agent here (More information on agents can be found here) |
| Gender | Enter the user's gender |
| First Name | Enter the user's first name |
| Last Name | Enter the user's last name |
| Street | Enter the street address of the user (You may use the company address) |
| Zipcode | Enter the user's zip code/postcode (You may use the company address) |
| Place | Enter the user's city |
| Phone | Enter the user's phone number |
| Birthday | Enter the user's date of birth |
| Company |
Enter the user's company name (if applicable) |
| Comments |
If you wish to add any additional comments or useful information, enter it into this field |
| Full Name of the Buyer* |
Enter the full name of the user |
| Preferred Language* |
Enter the user's preferred language |
| Email |
Enter the email address of the user |
| Password |
Enter a password. It's recommended to use a strong password such as using 1 Uppercase letter, 1 lowercase letter, 1 digit and a symbol. This will make the password more secure. |
| Password Confirmation | Repeat the password entered above (do NOT copy & paste the password!) |
Once completed, click the 'Save' button.
________________________________________________________________________
Remove A User Account
It is not currently possible to physically remove a user from the TrekkSoft system. If you no longer need a certain user in the system, you can:
- Edit the user's details and replace them or
- Add an email that does not exist e.g. delete@mycompany.com
To edit the email of a user, follow these steps:
- Go to your Admin Desk (e.g. yoursite.trekksoft.com).
- In the left-hand menu, click on Settings > Merchant Settings> Users & Employees.
- Next, click the Options button and click Edit
- Scroll down to the user's email address and enter e.g. 'delete@mycompany.com'
- Click the 'Save' button.
Note: The user will no longer be able to log in but the account will remain for any previous bookings that were completed.