Here's an overview of what we cover in this article:
- Overview
- How Can I Sync Trekksoft With My Own Calendar?
- My Calendar Is Synced! How Can I Use It Efficiently?
- What Information can be synced to your calendar?
- How Can I Remove Sync From My Calendar?
_______________________________________________________
Overview
The TrekkSoft Calendar Sync feature allows users to sync all activities, guests manifests and resources with their preferred calendar.
_______________________________________________________
How Can I Sync Trekksoft With My Own Calendar?
To sync Trekksoft with your own calendar, follow these steps:
- In your Admin Desk, on the left-hand side, click on Schedule and Manifests > Calendar View
- On the right-hand side, click on the Calendar Sync button
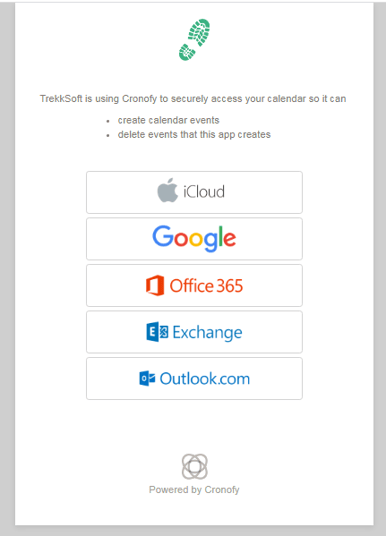
- When you click the Calendar Sync button, a popup window appears prompting you to connect your account with your calendar.
- Select your preferred calendar and authorize TrekkSoft/Cronofy (the service we use to sync the calendar) to access your calendar and select the calendar of your choice.
- The options for each calendar sync vary depending on the provider so from this point, follow the on-screen instructions.
IMPORTANT! Depending on the number of activities, schedules, resources, etc that you have depends on how long the calendar sync will take. This can vary from a couple of minutes to a couple of hours so please be patient!
_______________________________________________________
My Calendar Is Synced! How Can I Use It Efficiently?
Once your calendar has been successfully synced, you will be redirected back to your TrekkSoft account and a popup window will appear. Now, you will need to define exactly what features you wish to sync in the popup window (an example shown below):
- Resources - Sync only the activities that have bookings of one or multiple specific resources (this can be very useful if you have multiple guides or resources, as each of them can create a user login and sync their resource with their own calendar)
- Sync all trips - Sync All activities. This includes activities with and without bookings i.e. every single activity including every start time will show in your synced calendar.
- Sync only trips with booking - As the option states, this will only sync your bookings.
- Choose Calendar - Choose which calendar you want to sync to.
- Make sure to click Save!

_______________________________________________________
How to setup Timezone?

Make sure to Save settings at the bottom after selecting your time zone.
 _______________________________________________________
What Information can be synced to your calendar?
- Sync all trips: This will sync all the trips with tour/activity name along with the schedule.

- Sync only booked trips: This will sync only booked tour/activity with following details:
- Tour/Activity name.
- Date and time of the tour.
- Trip Occupancy.
- Price categories.
- Guests details including Guest ID, Number of guests, Price categories, Name of guests.
-
Link to redirect to Guest Manifest.

IMPORTANT NOTE! Sync of all the new bookings, rebookings, and cancellations in TrekkSoft to the synced calendar is immediate after calendar sync is successful. Make sure to refresh calendar if you don't see the sync.
IMPORTANT NOTES ABOUT OTA BOOKINGS!
- All the cancellations from OTAs to TrekkSoft is automatic and will reflect to the synced calendar as well.
- All the amendments/rebooking from OTA (Viator) is synced with TrekkSoft automatically and will reflect to the synced calendar as well. For other OTA, they usually cancel the old booking and create a new one.
_______________________________________________________
How Can I Remove Sync From My Calendar?
If you wish to remove the calendar sync, you can do so by following these step by step instructions (See video Instructions below):
- In your Admin Desk, on the left-hand side menu, click on Schedules and Manifests > Calendar View.
- On the right-hand side, click the Calendar Sync button. A popup window will open.
- At the bottom of the popup window, click the 'Delete calendar synchronization' button.
